I have this incredible knack for coveting items that are way out of my league. Now, I’m not talking about Coach bags, Jimmy Choo shoes or a Maserati. No, I’m drawn to seemingly simple everyday items that inexplicably cost a fortune. Let me paint you a picture: [on Pinterest] “Oh! That’s a really cute rug! … wow.it’s.$900…next” *Thud*
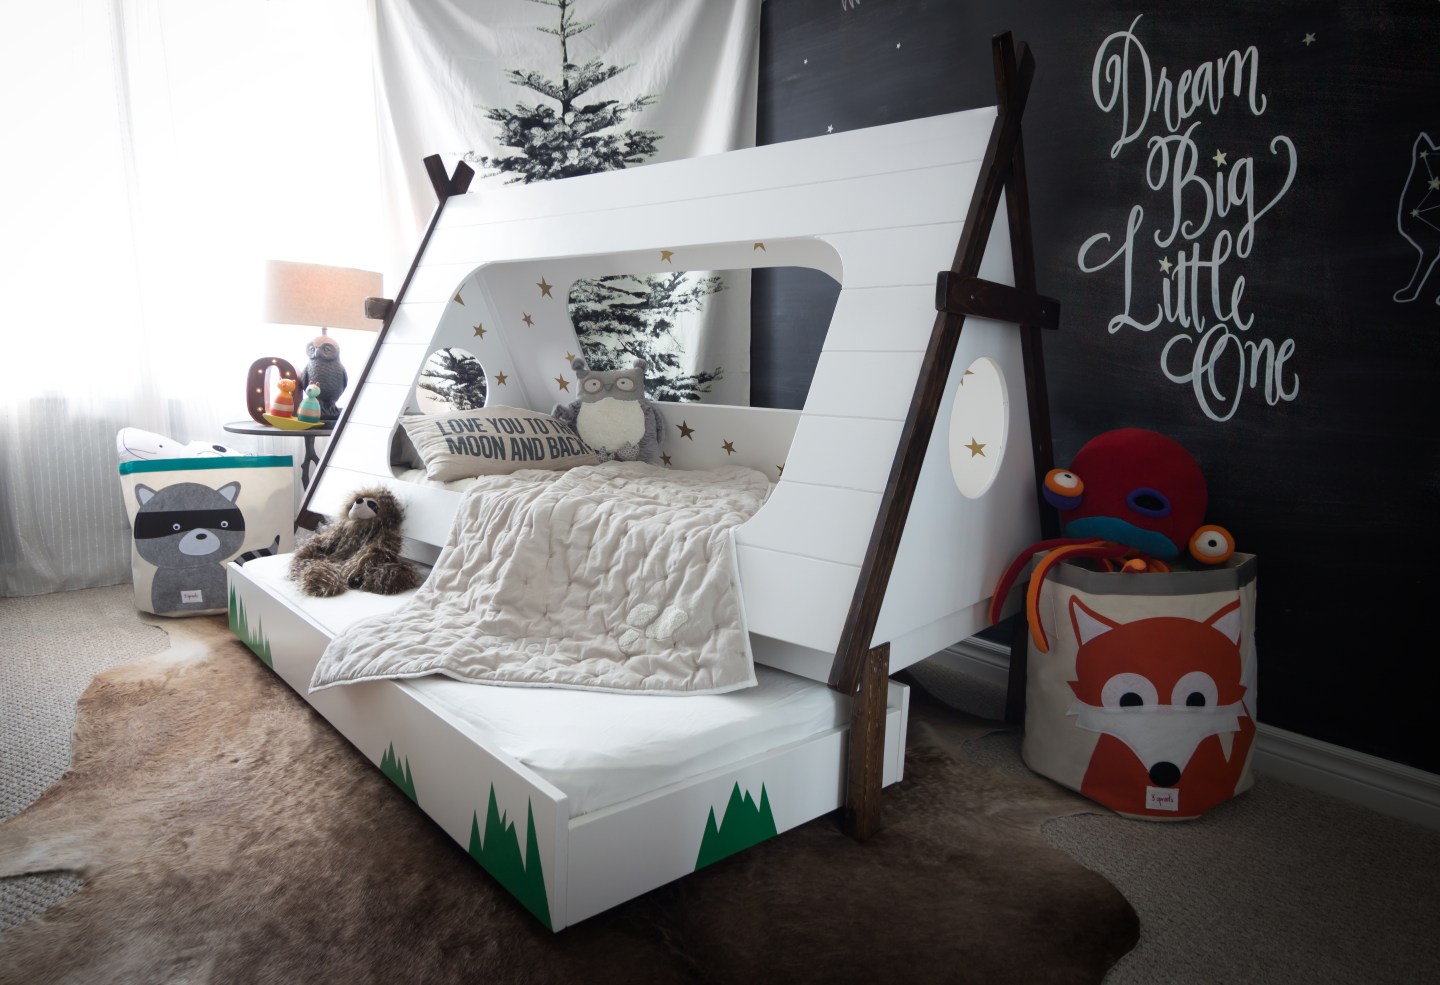
So when I came across a beautiful toddler teepee bed with pull out trundle that I couldn’t stop thinking about for days and knowing it would be perfect for my son, I knew what was in store for me. My first clue was the price of this adorable piece wasn’t listed on the site. I know, bad news bear. I later contacted the company for a quote when curiosity got the better of me. The bed is well over $2000 without shipping, tax and duty fees. Yikes!

Something kept luring me in though, niggling at the back of my brain, forcing me to visit and revisit the listing and single-handedly doubling their site’s daily viewership. What was it?
Then in the wee hours of the morning, I all but shot out of bed. I’ll make the damn thing myself. How hard can it be? *Glares* Check out my step by step tutorial!
UPDATE: It’s been 2 years, almost exactly, since I made this bed! It’s still going strong and looks the same as the day I finished it! There isn’t really anything I would change about it except that I have some better tools that would have refined its finish a bit if I were to redo it. In fact, I’ll be making a second for my daughter when she graduates to a toddler bed, that’s how happy I am with it!
If you’re about to read on, it may be because you would like to build one yourself! I encourage you to do so and I’m here to help with any questions you have…however, I’m not an engineer and so, I don’t feel comfortable upscaling the design for you to accommodate a bigger mattress. I went with this particular mattress and size so that I would have solid sides made of a single sheet of wood. Making a bigger version may result in seams or frankensteining pieces together that would threaten the integrity of the structure. Since this is a child’s bed, I don’t want to give advice I’m not qualified to give and so I can only answer questions on my particular build.
With that out of the way, let’s get down to business!

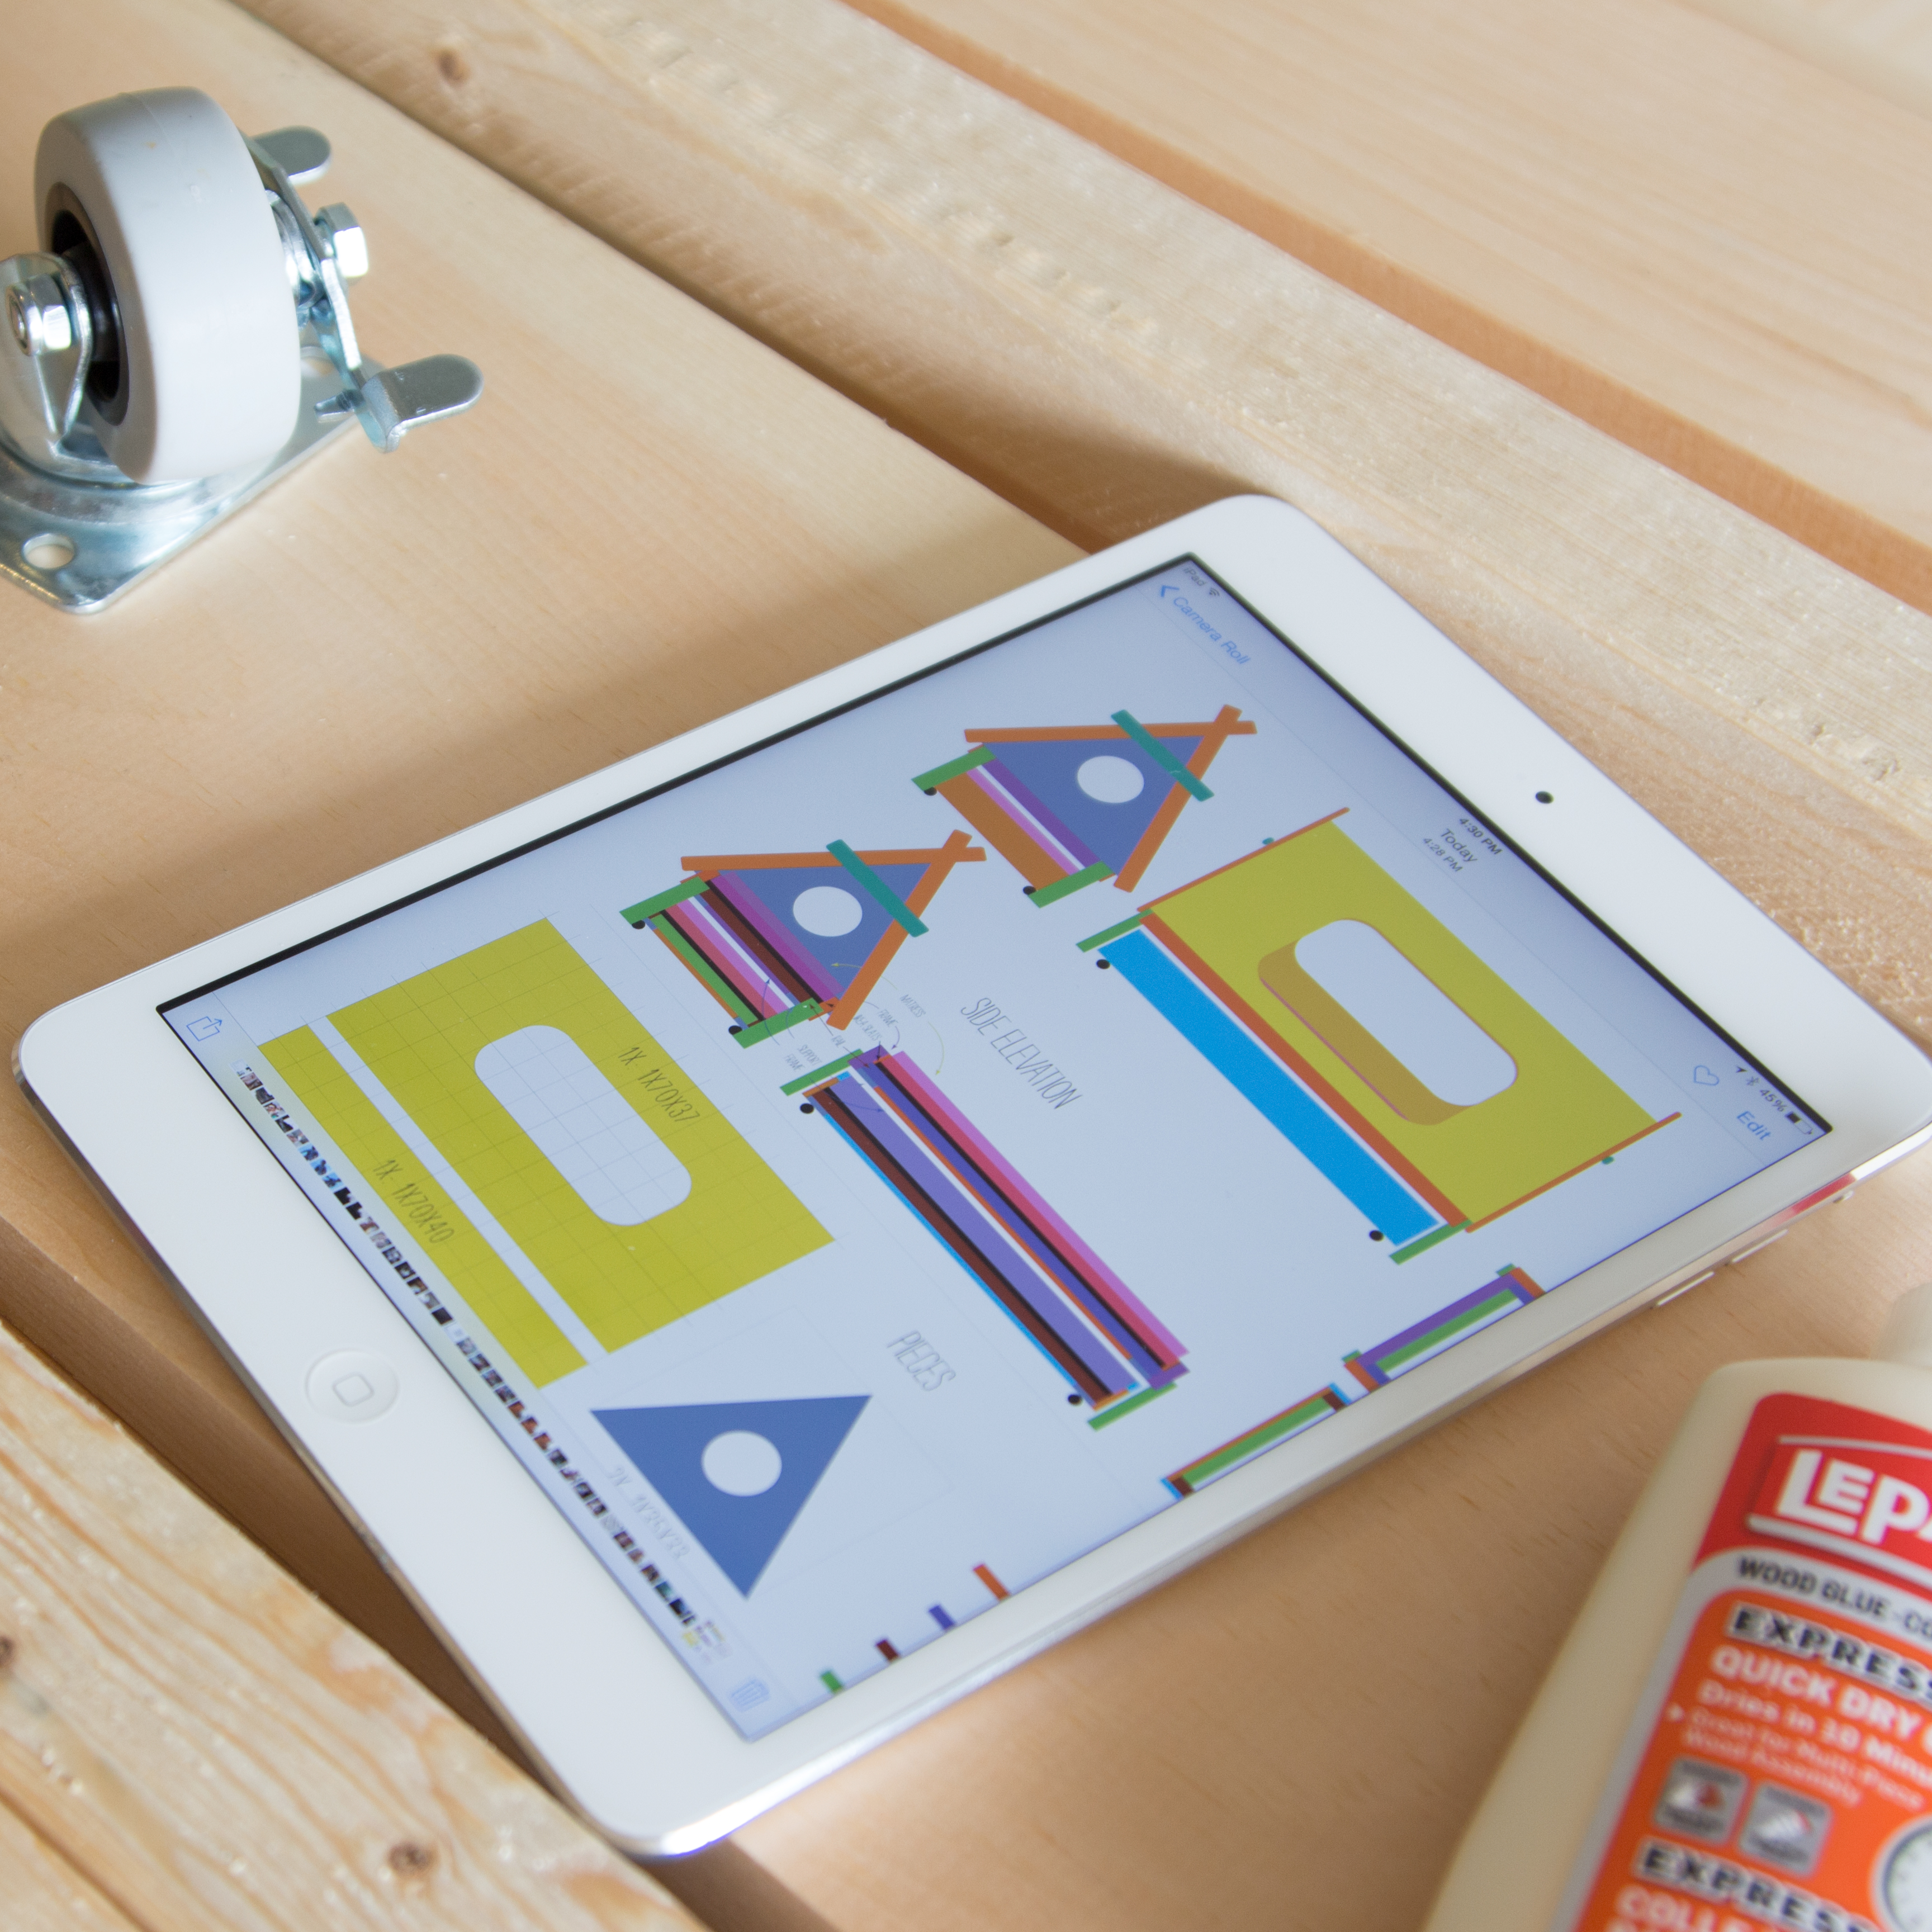
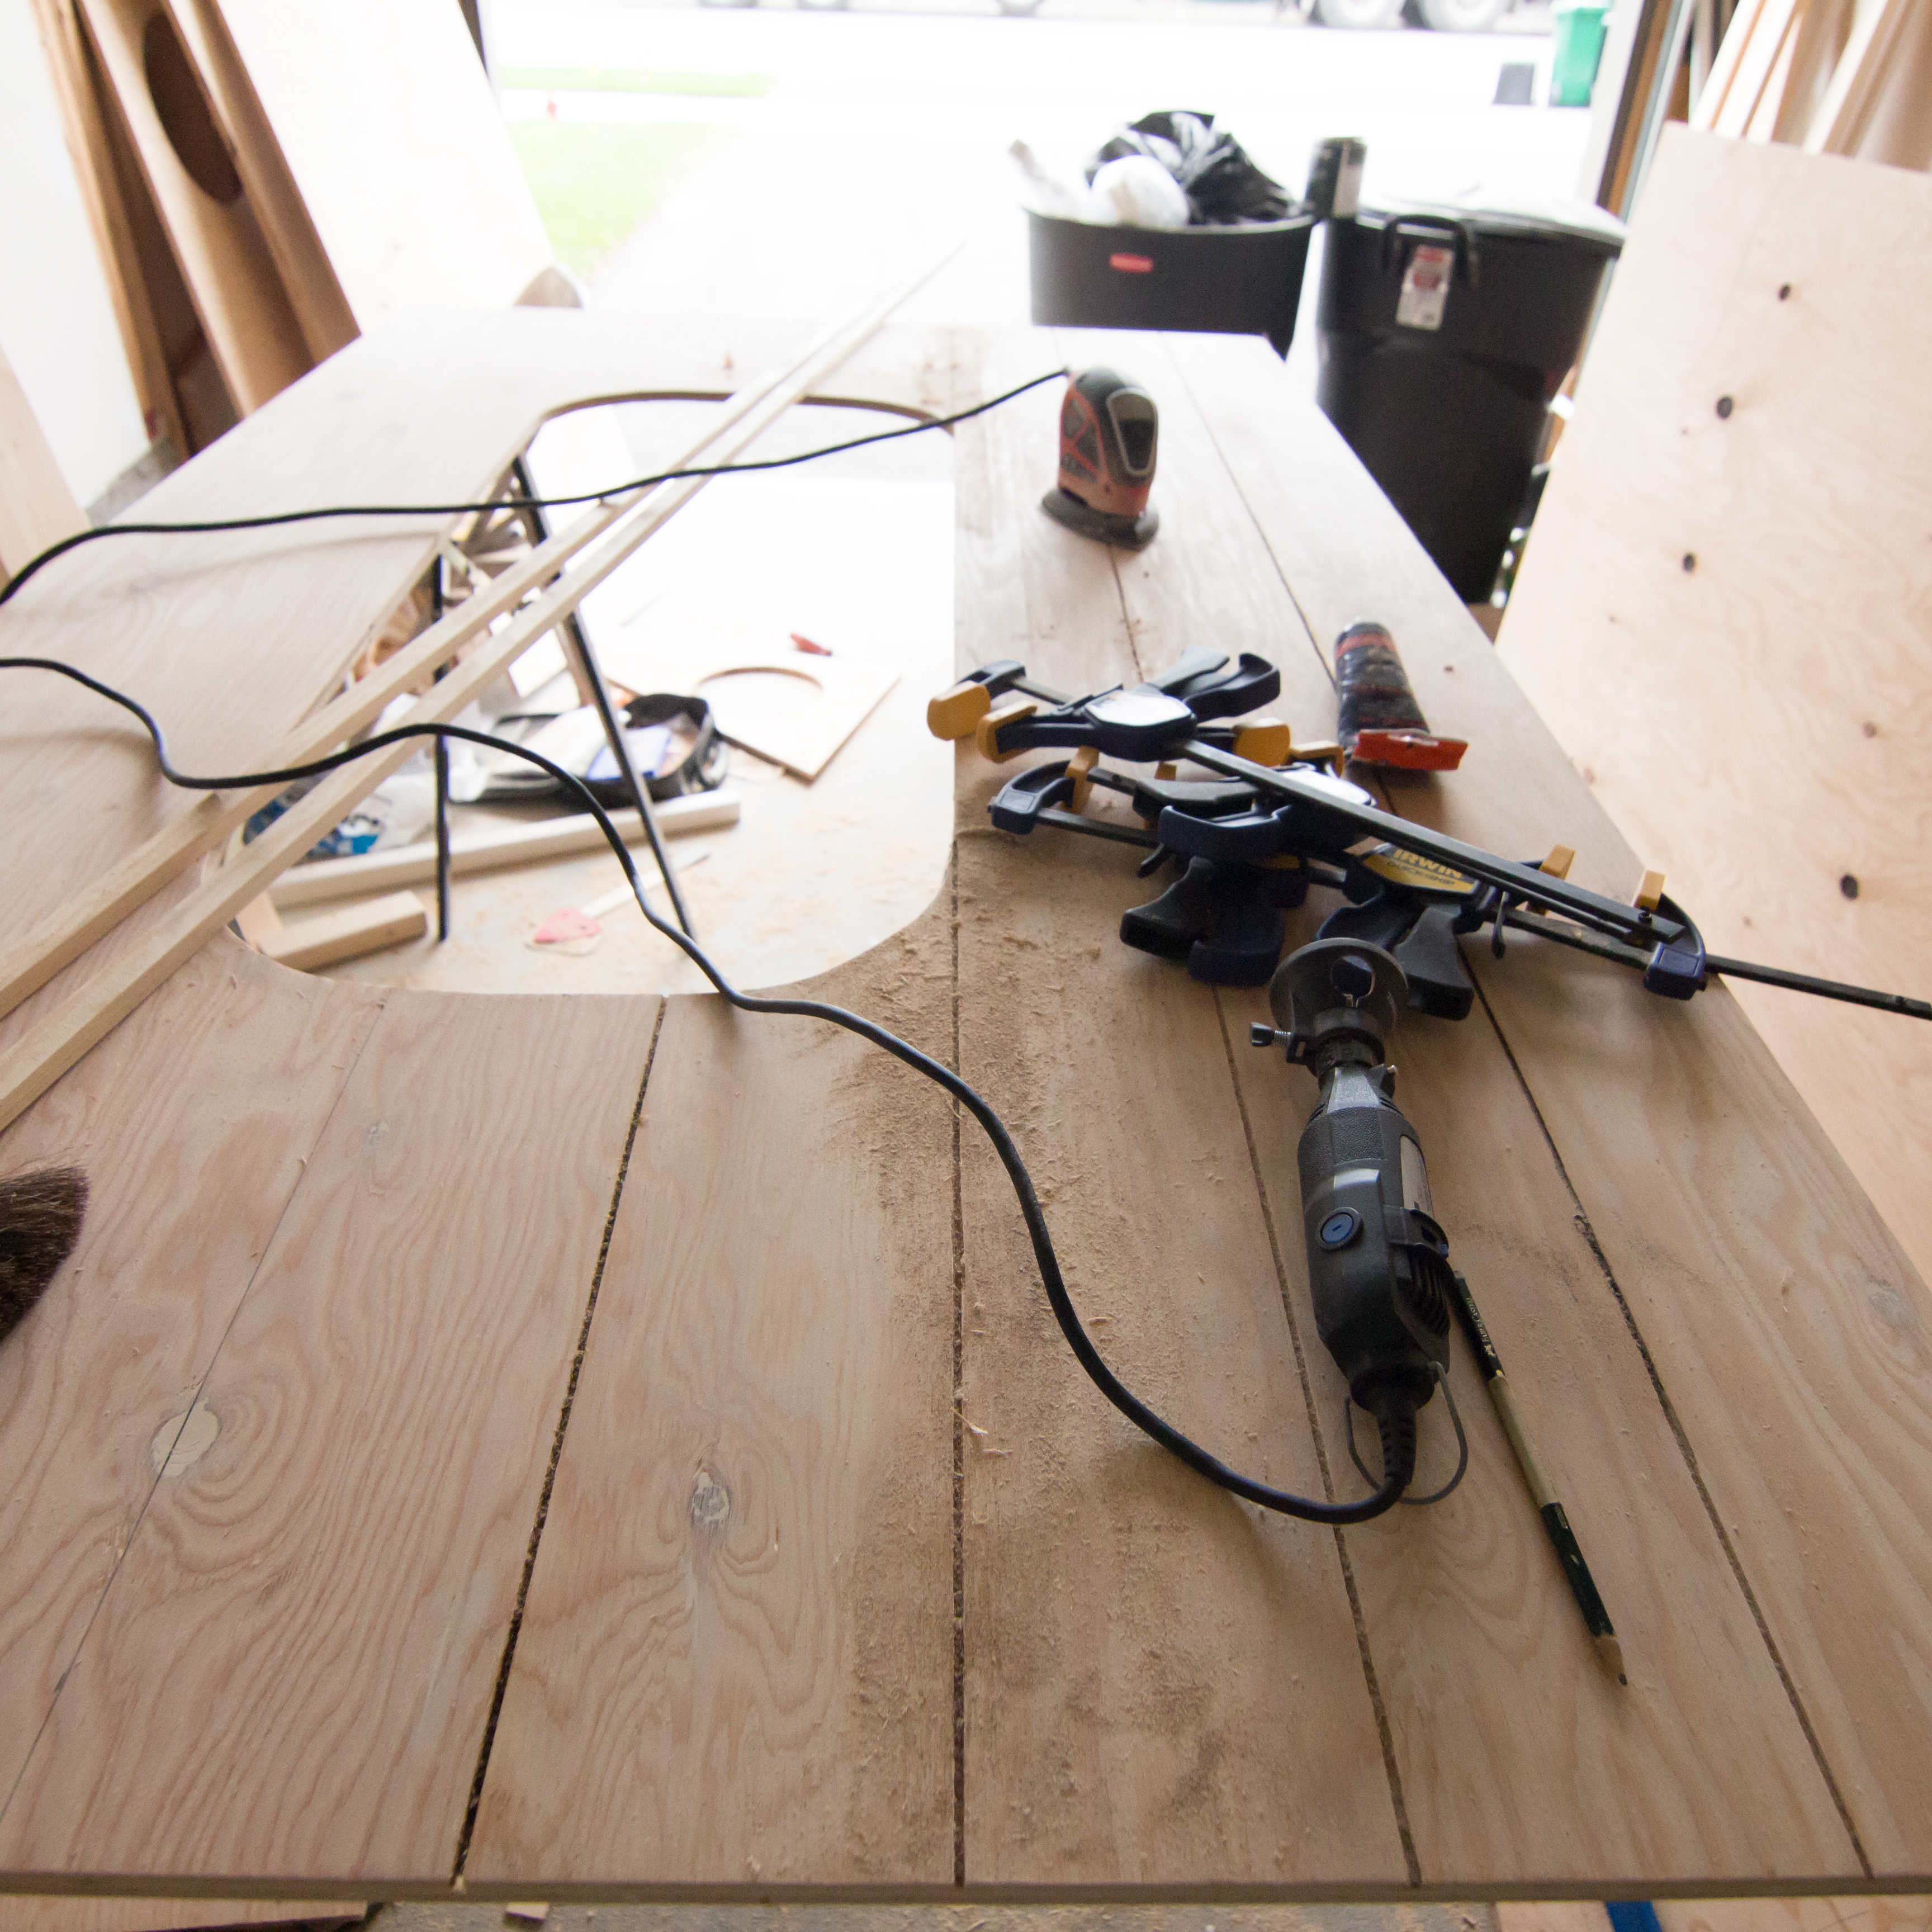
After days of studying the photos from different angles, making my own schematics, soaking up encouraging blanket statements of “No, I don’t think you’re crazy” and “I love that you want to do this” from my fiancée, and several trips to Lowe’s later, I got started.

What began as “How much money can I save?” quickly changed to “How far can I take this?” And with the help of some old favourite tools, brand spanking new tools, and even tools I had to macgyver myself, the answer was pretty clear; ALL the way! (An extremely brave, supportive fiancée and a couple several bottles of wine also helped).

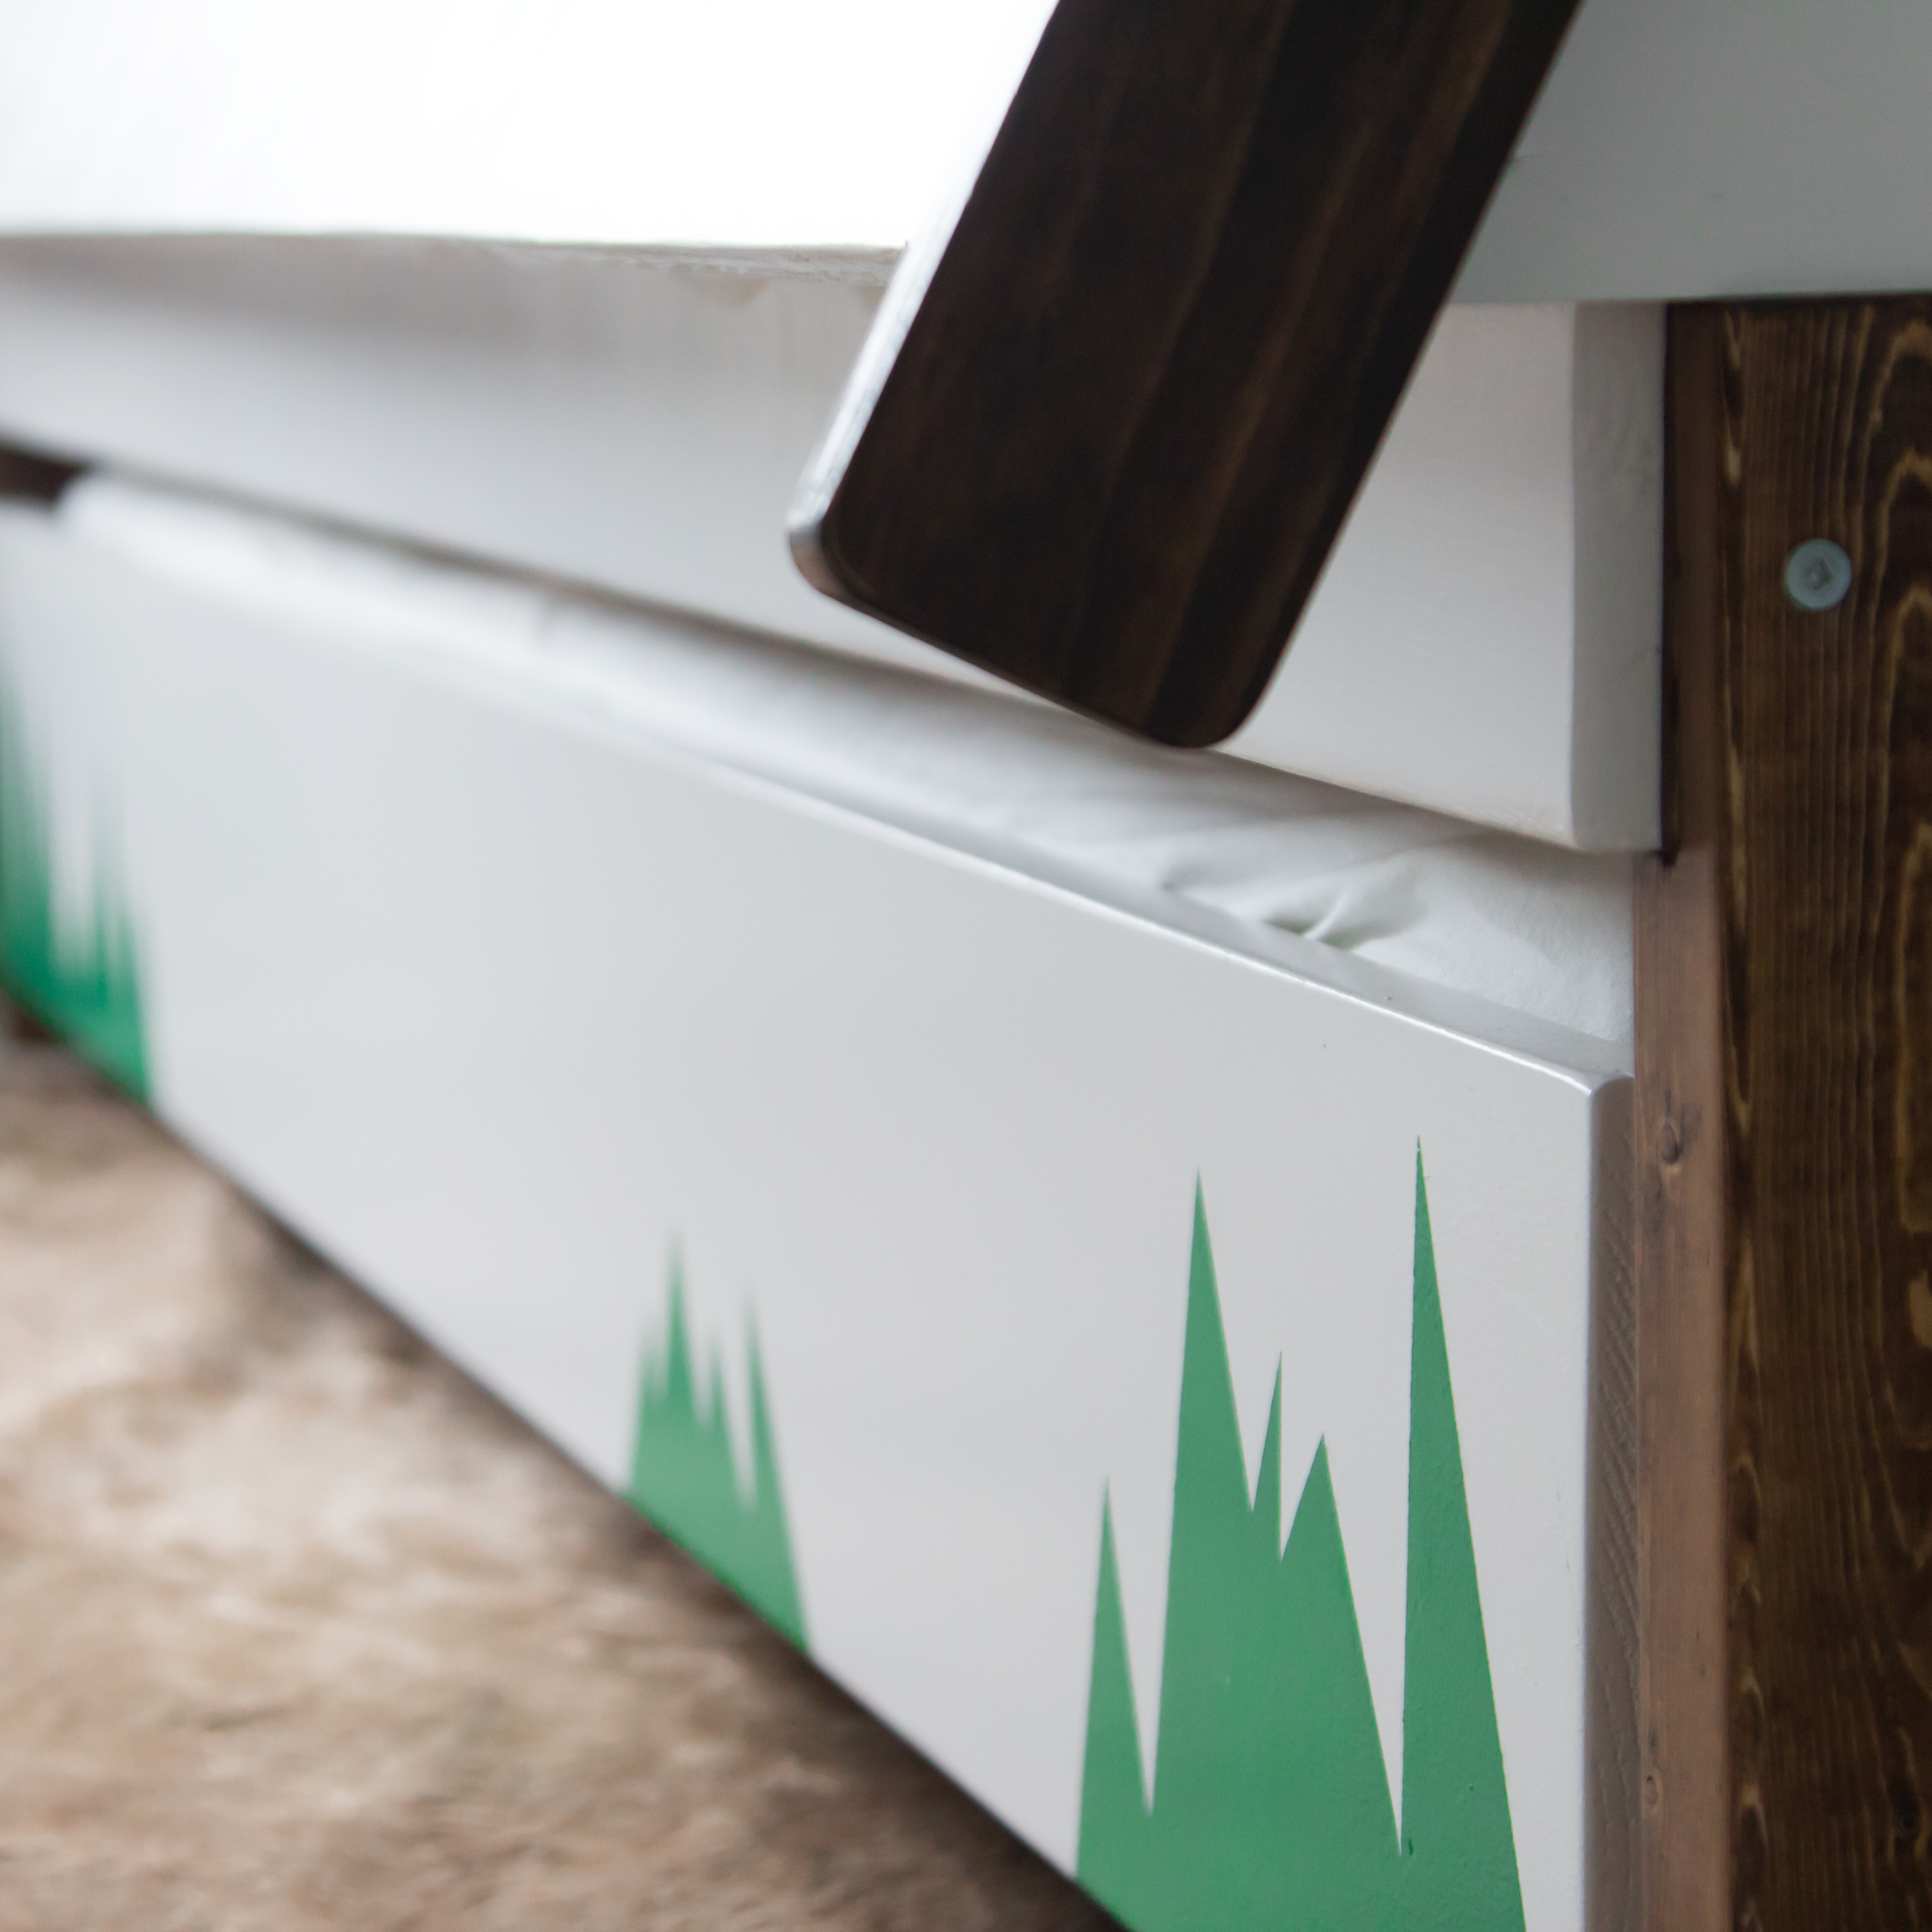
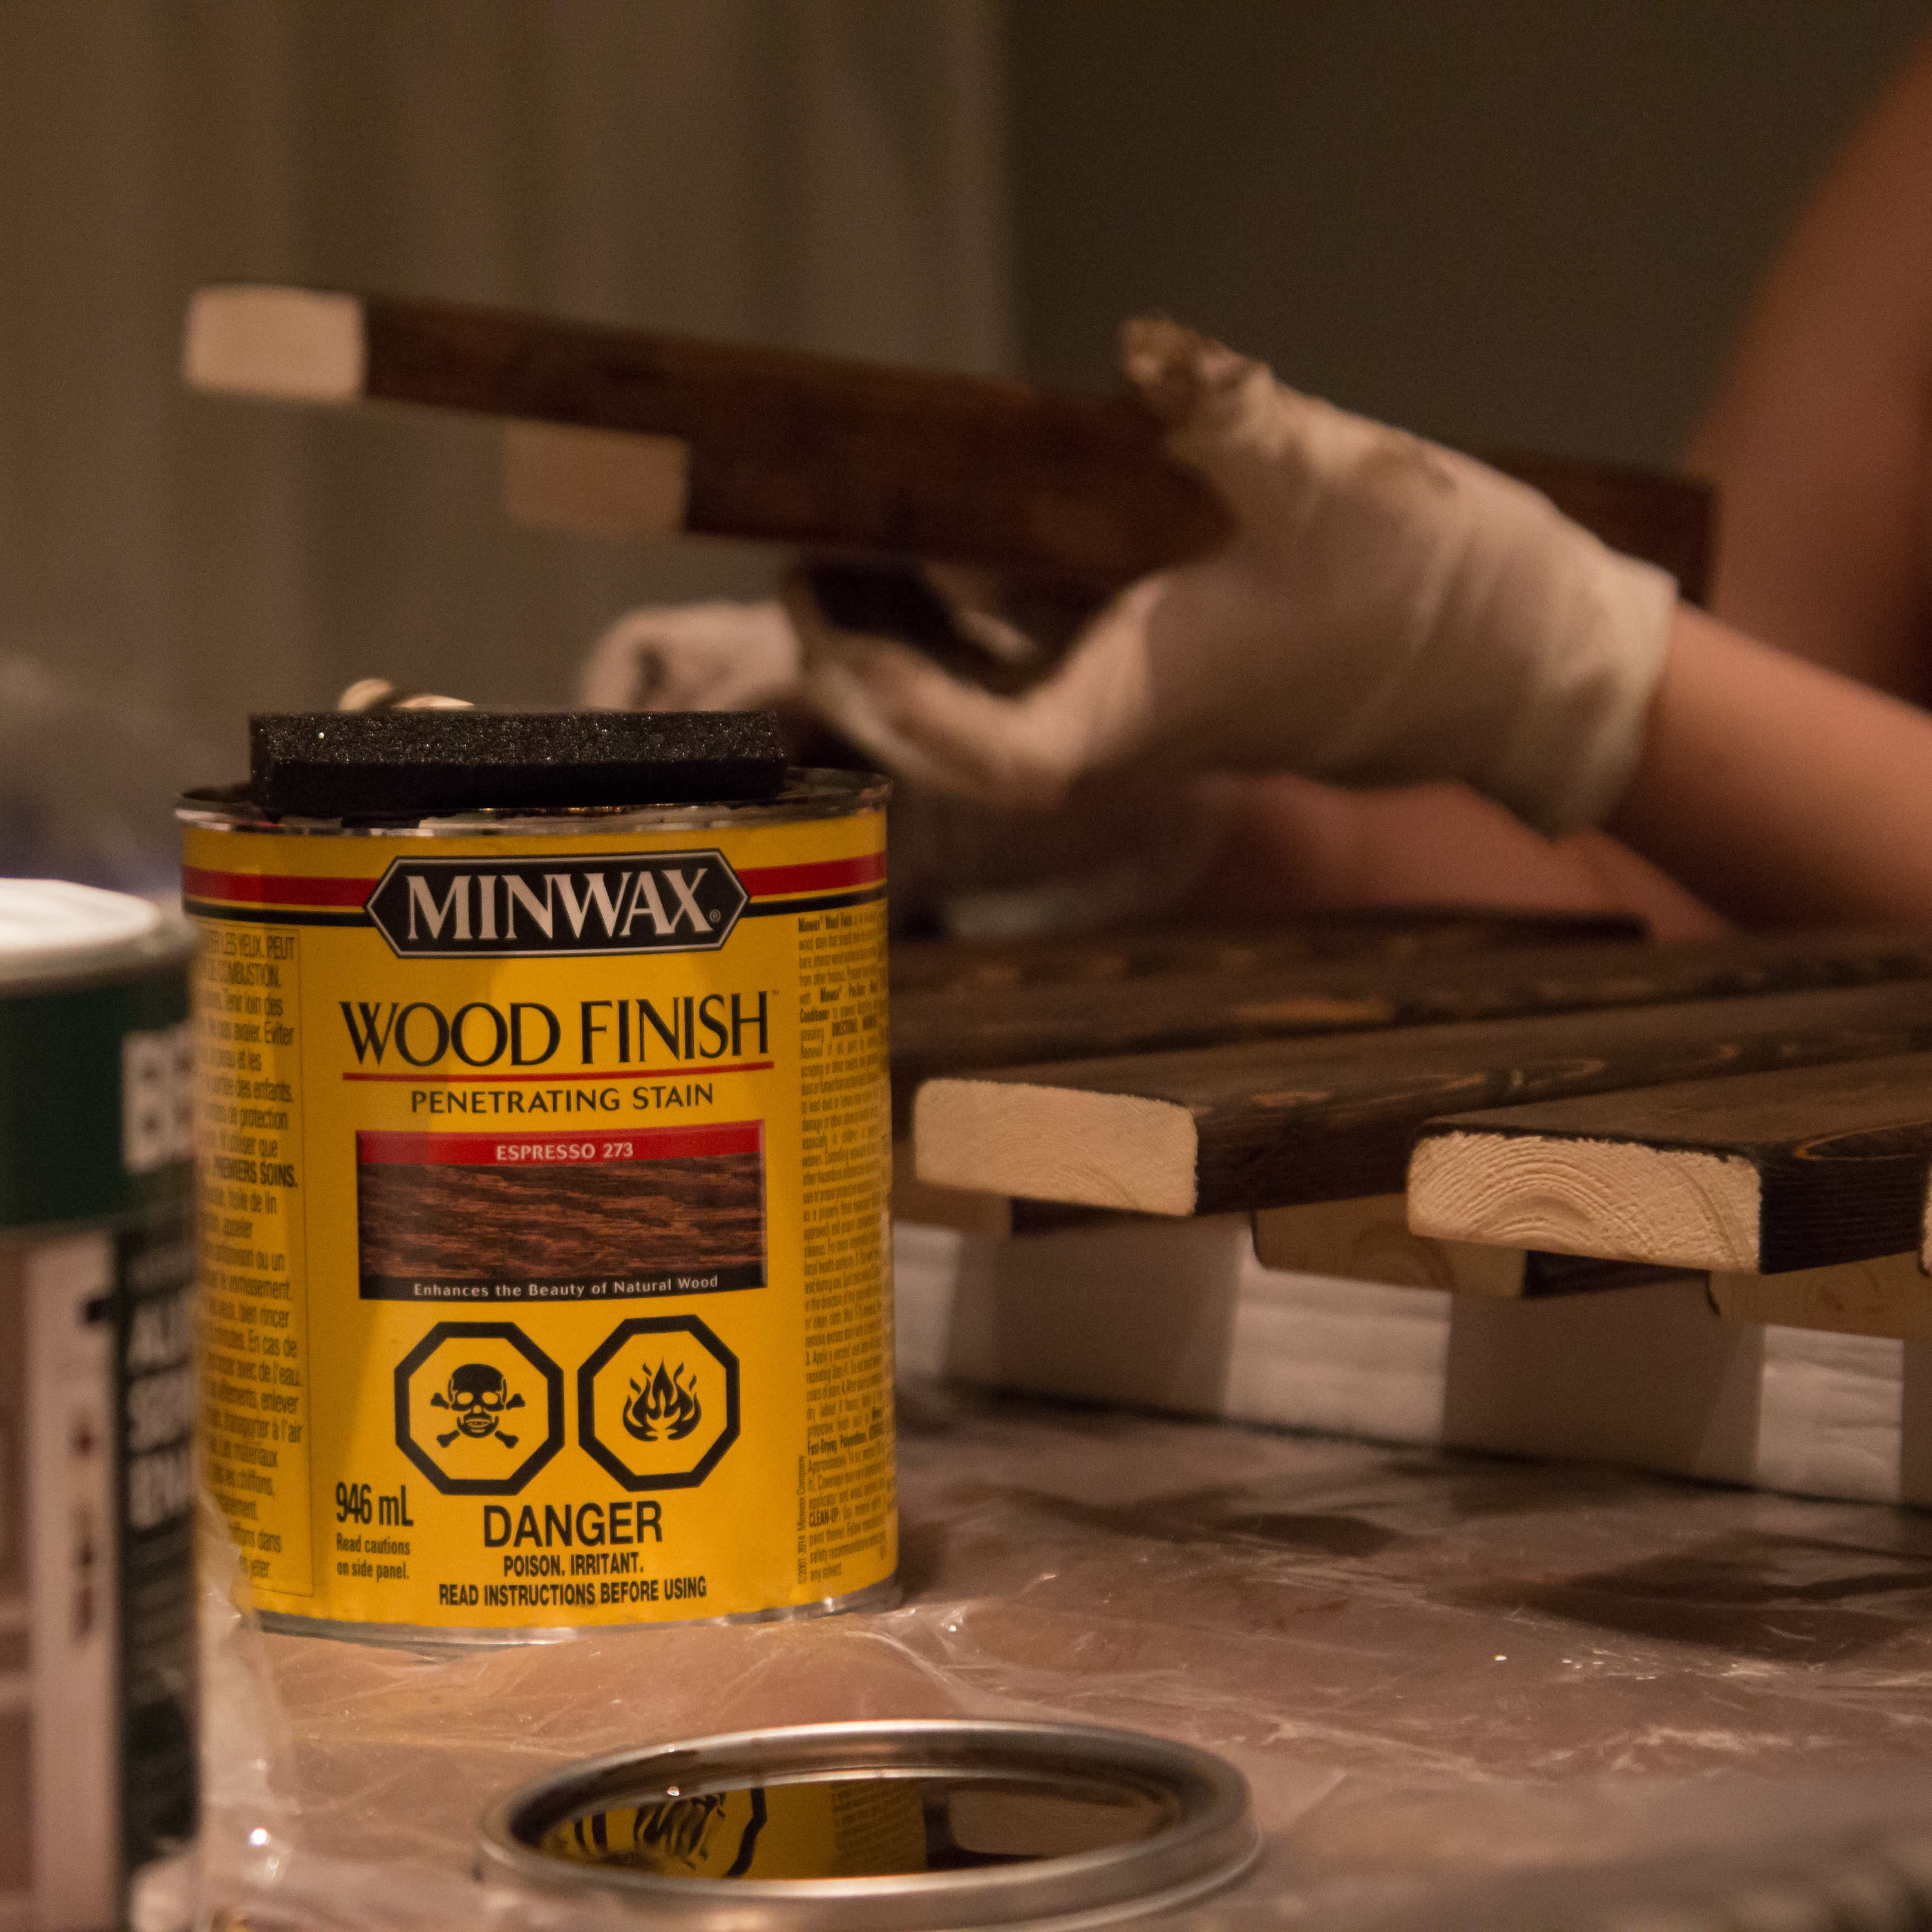
Needless to say, a lot of lessons were learned during the past few weeks: 1. NEVER cut corners. You’ll just be doing that ______ over again tomorrow if you do. 2. ALWAYS test, test, test. Test cutting a circle with your weird, hand-made, mounted jigsaw contraption before cutting that $45 piece of wood. 3. Wood is NEVER the thickness it says it is…nor is it the length or width that it’s advertised either. I’m still pretty annoyed about that last one.


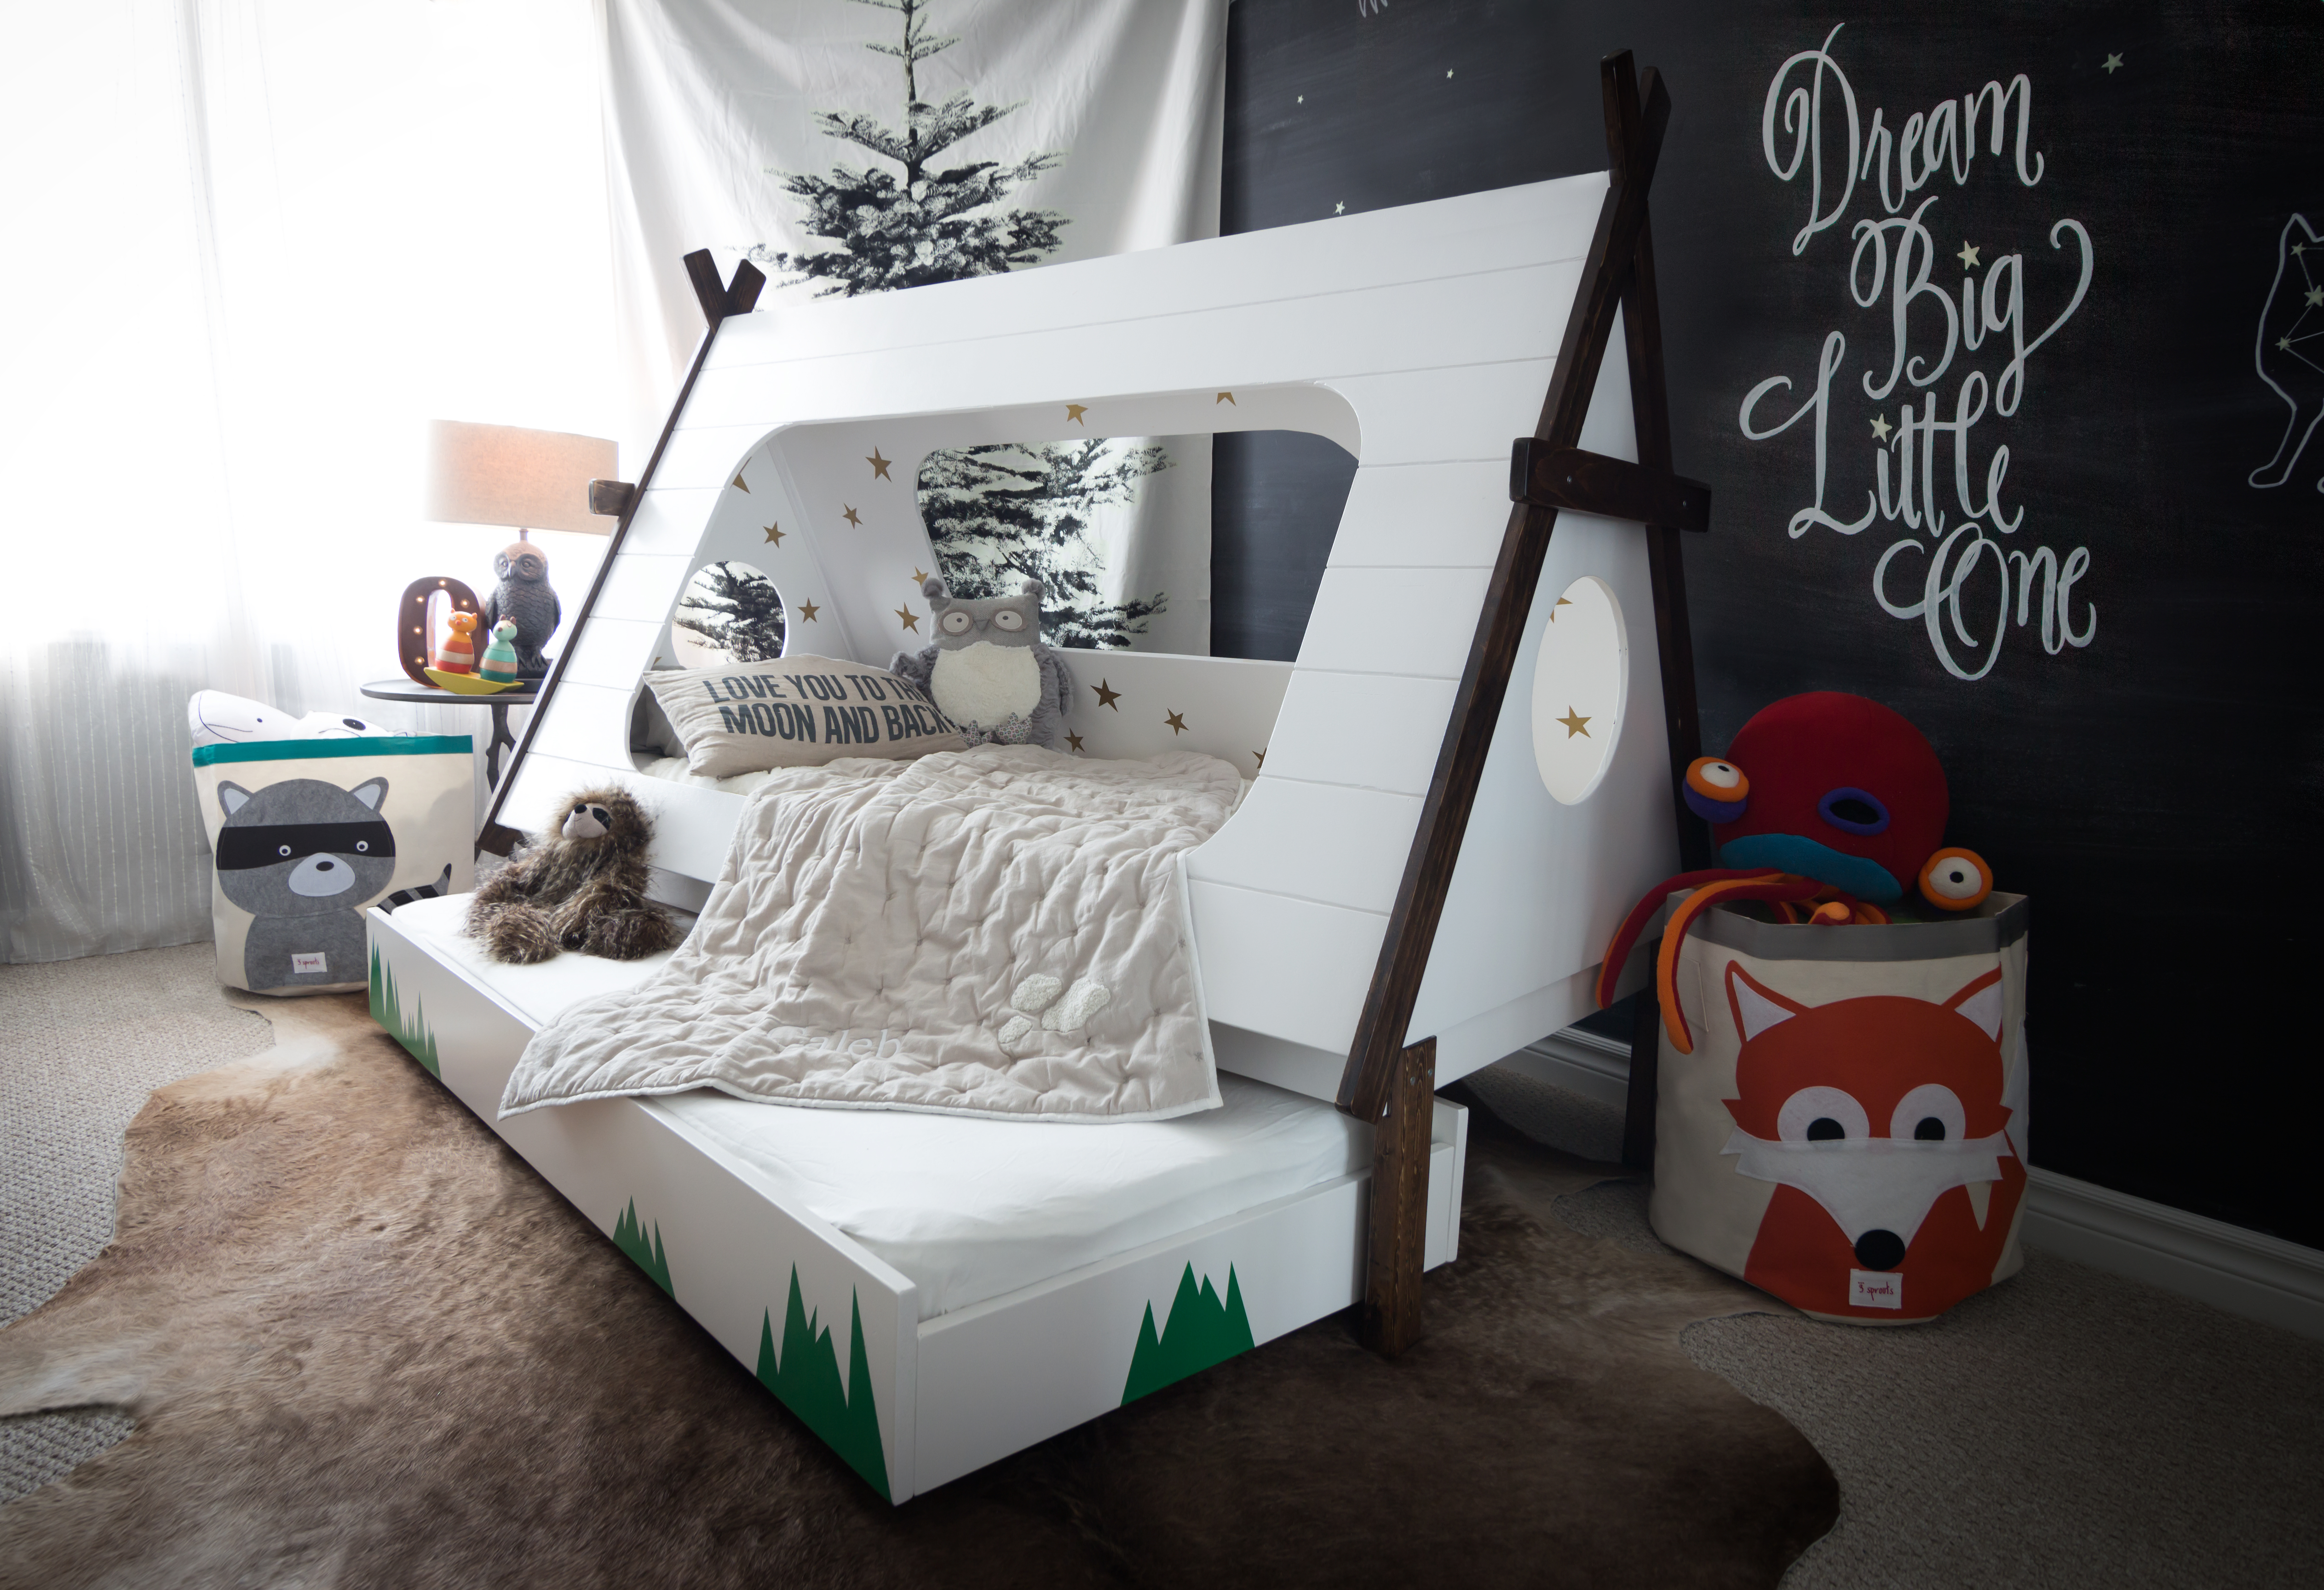
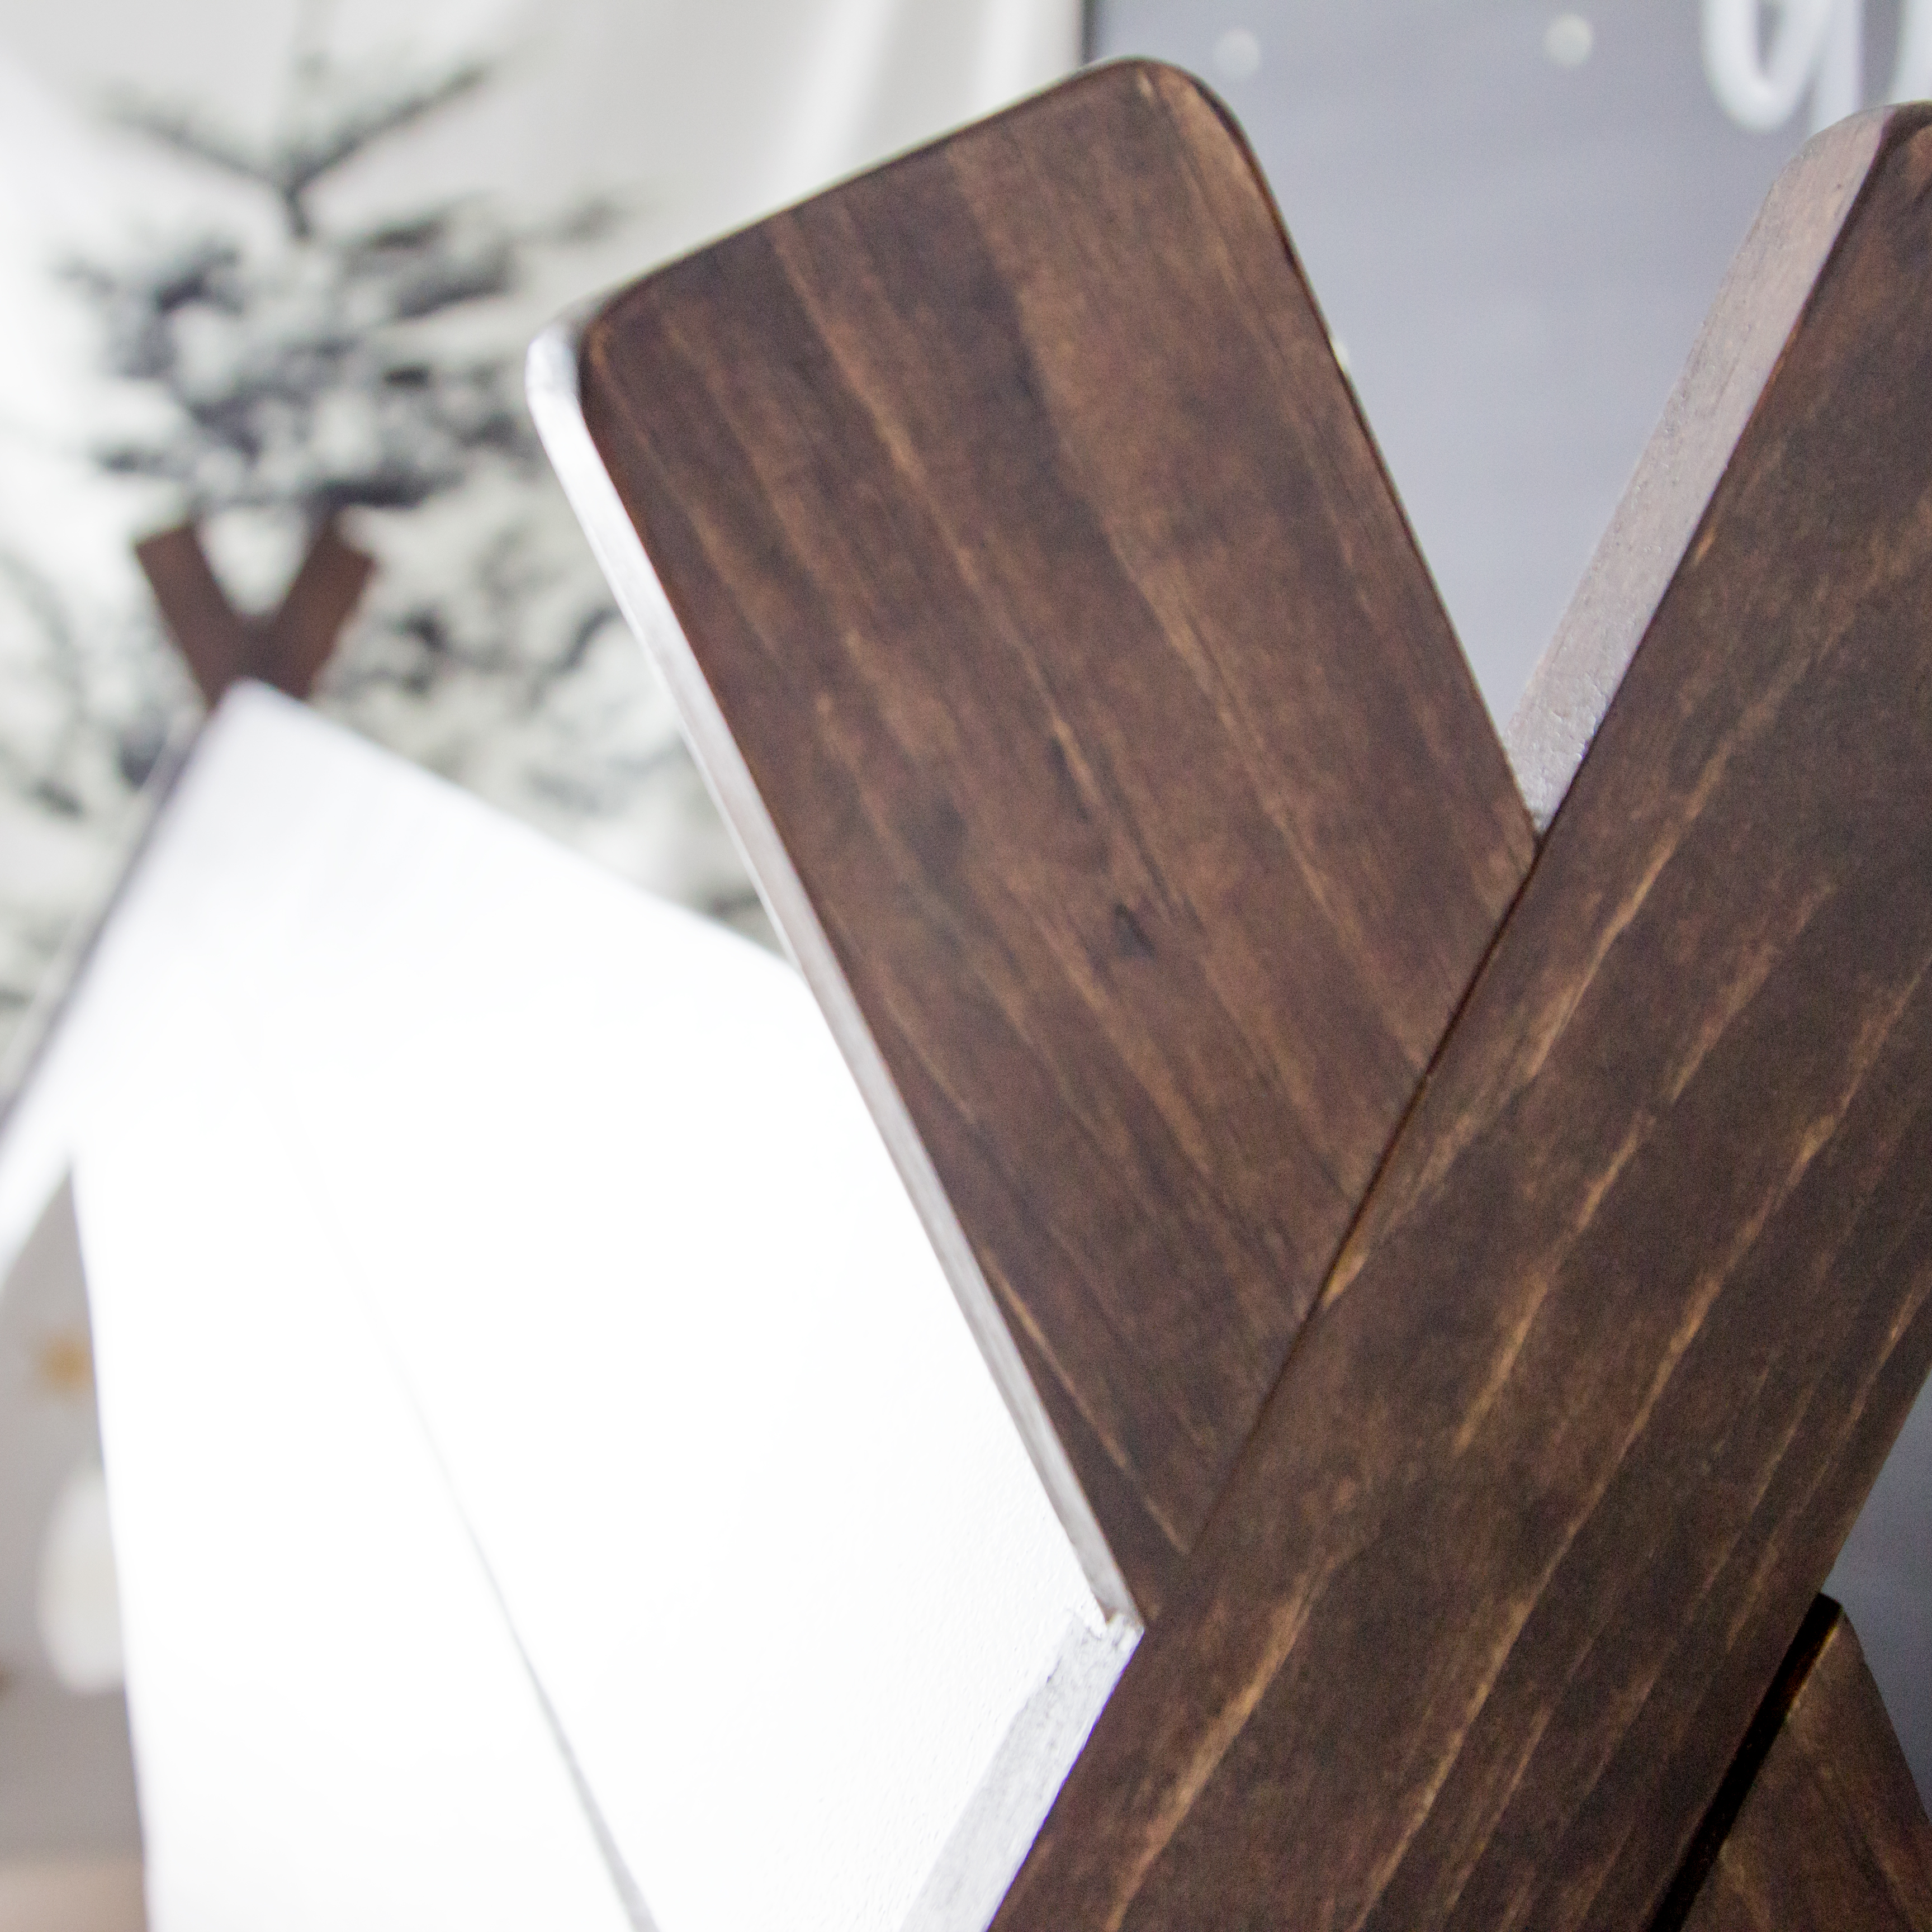
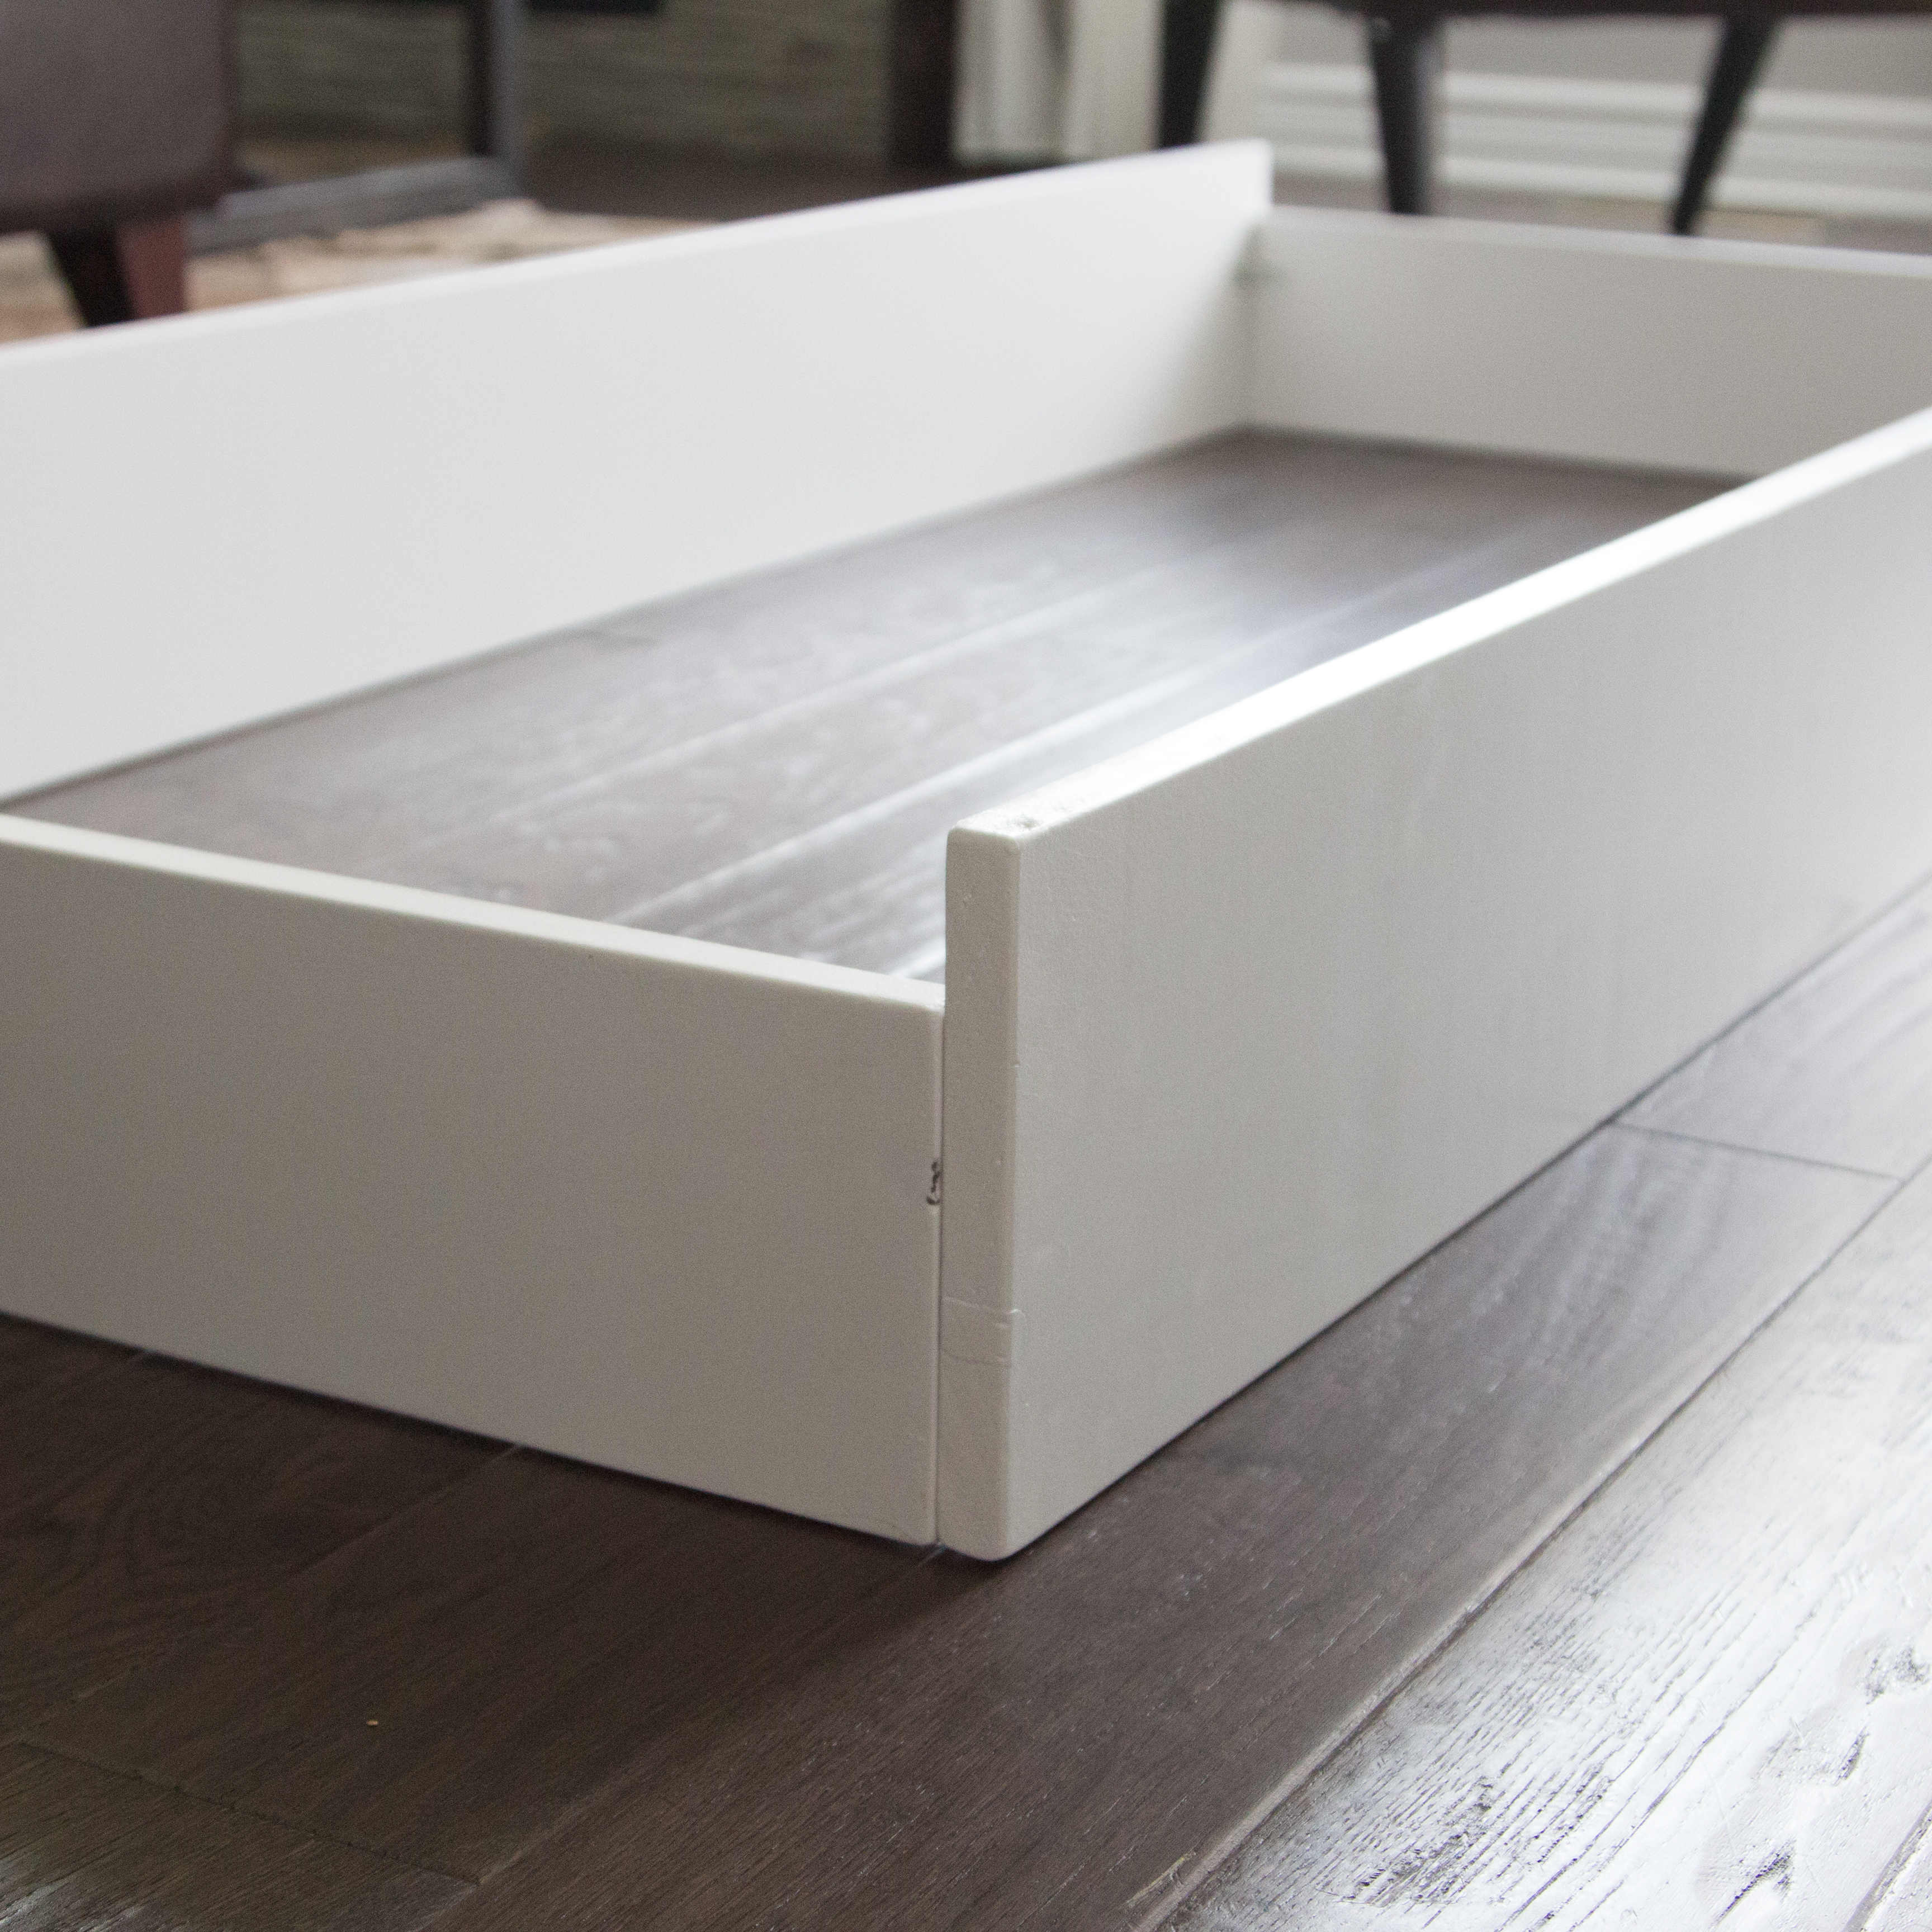
All in all, it turned out great! It’s sturdy, the corners line up, it can be disassembled and reassembled with minimally visible screws, it’s personalised with stain to match his dresser (that we also finished ourselves) and metallic stars to match the decor and it has a second pull out bed for sleepovers! I am very proud of myself!

I think someone else is proud of me too and excited to be in his new bed…a year from now ![]()


Simply amazing kiddo. And an amazing mind as well. You are definitely your mother’s daughter. Thanks for sharing. It really brightens up my day.
Better celebrate with a bottle of wine. If there’s any left. 😉
LikeLiked by 1 person
Thank you John! I always appreciate your kind words. I’m always happy to hear that my posts put a little sunshine in someone else’s day as well. It means alot! And of course there’s wine left…Andrew’s job is to make sure of that hehe.
LikeLike
Hi
You are a special mother. He is lucky have a mother like you.. I like your all posts. thank you for sharing your thoughts and creativity with this world. I am from India, living Dubai. Now we got this blog because of your gift to your kid.
LikeLike
This went beyond anything I could have imagined! Blown away Sarah. Seriously!
LikeLiked by 1 person
Thank you Krista! That means alot, truly!
LikeLike
It is stunning! You amaze me Sarah!! Not just that you built this beautiful thing, but built it with an infant at home – when I was home with my first child, my act of genius was taking a shower before noon. Congrats! xoxo
LikeLiked by 1 person
Well, I will admit the house was severely neglected during the weeks I spent building the bed. I’m also grateful to have a napper. He was teething alot through this and would sleep for 4 hours at a time during the day lol. The stars aligned (see what I did there ;)) for the making of this bed! Thanks Theresa!
LikeLike
Great job Sarah. As a furniture maker myself, I see the complexity in what you did and am impressed. If you ever need help or a crazy tool for that 1 job, let me know.
LikeLiked by 1 person
great job Uncle Phil and I are very proud of what you built. when I ask him to build me something and he says no I will call you.lol
LikeLiked by 1 person
This is so amazing! Thanks for sharing! We girls can do anything!
LikeLiked by 1 person
Hi, Sorry to contact you here, but I didn’t have an email address for you. I’m an arts and culture writer with ViralNova, and we wanted to feature this bed on our site. I just wanted to make sure you’d be okay with us using some of your images for the article — I noticed you went through the trouble of watermarking them, so I thought I would ask permission. Your blog would of course be credited, with links. Let me know! You can also email me directly at lcaseley@viralnova.com
Thanks!
LikeLiked by 1 person
Hi Laura, thanks for your interest! Sounds great! I’ll email you shortly for details.
LikeLike
Hi! I’m a writer who is interested in covering this for LittleThings.com. I noticed your original post on Imgur. If you’re interested, contact me at elyse@littlethings.com
LikeLiked by 1 person
Sounds great! I’ll be in touch!
LikeLike
This is so awesome! I’m a grown woman but I suddenly want a bed like that 😀 And that #3 lesson “Wood is NEVER the thickness it says it is…nor is it the length or width that it’s advertised either” I hear that A LOT from my father. He says wood and even metals that he orders for his work (they make AUV cars) are never what’s it’s advertised. That’s why he has to make a special order or something from the manufacturer. Anyway, congrats! It’s so beautiful and unique.
LikeLike
Thank you! Ya, I’ll admit I found out the hard way about the lumber dimensions. It resulted in a do-over on the first bed frame. Another Reddit commenter graciously informed us that the dimensions are based on green wood and that once it’s dried, it shrinks. Who knew! BTW I hope you don’t mind me creeping your blog! 🙂
LikeLike
I don’t mind at all 🙂
LikeLike
This is so awesome! What software/app did you use for the schematics? 🙂
LikeLike
Thanks for asking! I used Adobe Illustrator because that’s what I’m comfortable with coming from a graphic design background. Obviously there are better programs out there that are meant for this type of thing like Sketchup or the super ambitious, AutoCad. In hindsight, something with 3D rendering would have helped troubleshoot quite a few things but sticking to what I know saved alot of stress when I was already in unknown territory with my first dimensional build.
LikeLike
I would love to make this bed for my little boy! Are you able to share the schematic you made on illustrator?
LikeLike
Hi there!
My name is Maggie, and I’m an editor at POPSUGAR Home. We’re crazy about this teepee bed and would LOVE to share it with our readers. Would you mind if we featured a few of these images (with a credit and link back to your website, of course) and a link to your full tutorial on Imgur? Please let me know. I can be reached at mwinterfeldt@popsugar.com. Hope to hear from you soon!
Maggie
LikeLike
Oooooh thank you for reaching out! We’ll be in touch!
LikeLike
Awesome! I’m thinking of one for my little boy. and this is well the idea! Thank you.
You’re a great Mom!
LikeLike
Thank you for saying so! If you make one, send us some pictures! I’m also here to help and answer any questions along the way!
LikeLike
Do you have a tutorial for the stars and grass 😆 I’m so not the least bit crafty.
LikeLike
Soooo pretty. I want to kmow how much momey did you put it in before i start the project for my 2 daughters.
LikeLike
Great question, thank you for asking! We spent roughly $650 CAD on the bed. The most money went towards the roof pieces, paint and mattresses.
We used a finished 3/4″ pine plywood for the roof and it required 3 8′ pieces at $50 a piece. There are definitely cheaper and more expensive options out there.
The paint we used was an enamel paint, so it was a little more pricey but durable. We went through 3 cans of white and 1 can for the grass at $50 a can.
The mattresses were $80 each, on sale.
All that to say $600 is definitely easier to swallow that $2300 but there is room to cut back on price even more if you like. I hope this helps and please let us know if you have any more questions. We’d love to help!
LikeLike
Love your creativity! Could you give an estimate on the final cost put into this project (mainly for the wood)? Just curious before I talk myself into trying this 🙂
LikeLike
Love, Love, Love your work/project! Can you tell me where you found the stuffed owl or maybe you made it. The whole room is fabulous. Most people never know or appreciate all the time and effort to complete such a beautiful project. Thanks for sharing all the steps you took to make it happen.
LikeLike
Thank you Kate for saying so! It definitely was quite an experience and I’m glad I decided to share! I love hearing people from all over saying they are going to follow in my footsteps and build one themselves. Something this nice should be shared, right?!
Thank you for asking about the owl. He’s one of my favourite purchases. He’s from Simon’s and he can be purchased here: http://www.simons.ca/simons/product/10078-6122100/Printed/Stuffed+owl+cushion++13%22+x+13%22?/en/&catId=6951&colourId=99 (Canadian site). And he’s on sale! I’m jealous. lol
LikeLike
Hello Jordyn! Sorry for the late reply. I hope you’re still considering a build! The final cost to us was around $600. We bought all our materials between Lowe’s and Home Depot and during a tax-free sale, which both stores always seem to have. We used finished pine wherever we could to cut down on labour and saved a bit by using dimensional lumber (furring) inside the frame where it can’t be seen. The priciest pieces were the roof pieces, which were finished pine plywood at $48 a pop and we used 3 pieces to make the roof and triangles. All-in-all, I would say the lumber cost us around $400 CAD. I hope this helps!
LikeLike
What a wonderful idea and exquisitely executed! I was hoping you could tell me where you got that big pine tree sheet in the background, or if you made it?
This room makes me want to go on an adventure! Thank you so much for sharing:)
LikeLike
Hello Irene! Thank you for stopping by! We hope it inspires our son for adventure too! As for the sheet, it’s actually an Ikea textile. The catch is, it’s an older version. They still carry it but it’s slightly different and can only be bought in-store. It can be seen here: http://www.ikea.com/ca/en/catalog/products/60289852/ We bought ours on ebay though because I preferred the version with snow AND it’s glow in the dark! I hope this helps and happy hunting!
LikeLike
Thank you so much for your quick reply! I can’t wait to see more exciting blog posts from you:)
LikeLike
Hi Sarah
Just came across your amazing bed and would so love to feature your son’s room and your amazing work in a new Toddler magazine we are launching in Australia. I was hoping you would like to share a few photos of the finished room and answer a few questions to include in the piece about your inspiration and style choices etc.
Please contact me directly at my below email and I can elaborate more about the magazine etc.
Many Thanks
Samantha
Samantha Docherty
FASHION & MARKET EDITOR, PARENTING & KIDS
Bauer Media Group
Level 9, 54 Park St
Sydney 2000, Australia
T + 61 2 9263 9784
sdocherty@bauer-media.com.au
http://www.motherandbaby.com.au
http://www.bauer-media.com.au
BAUER MEDIA GROUP
LikeLike
Wonderful! I’ll be in touch shortly!
LikeLike
Hi Sarah !
I’m a french girl, and I shared my DIY work too. As I love yours Tipi DIY, I translated it on my blog ! You can read it if you know a little bit of french ahah 🙂
Bye,
Pingotine alias Perrine.
LikeLike
Hi Sarah,
This is incredible and exactly what I was looking to make for my son. Thank you, you just made my son one happy little boy!!!! I was hoping that you could tell me where you found the plans for this that I saw in the picture with your iPad? It would be greatly appreciated, I am very much a visual kind of person : ) Thank you and keep building and creating, I can’t wait to see more!
Much Thanks,
Kate
LikeLike
I was wondering where you got your animal toy bends ? they are so adorable! Thanks
LikeLike
Do you have a link to your sons entire room? I would love to see a tour everything. This is amazing!!!!
LikeLike
I have a little post about it here:https://hellobowsers.com/2015/08/01/his-crib/ My son is only a year old so we’re still in the nursery phase but we already have ideas on how to transition this to an older little boys room! Stay tuned!
LikeLike
Kids’ bedrooms are my fave!! I love EVERYTHING about this project. What a fun, beautiful, and inspiring bedroom! The details are exquisite, and the outcome is a masterpiece. The sight of this bed and bedroom makes me absolutely GIDDY! Thanks for sharing your creativity. 🙂
LikeLike
This is beautiful. The only change I’d make is to make it fit a twin size mattress to make it last longer than the toddler years. All that effort has to be stretched because I’m ridiculously lazy. 😉
LikeLike
…and miss the opportunity to build cottage bunk beds like these?!
In all seriousness, I considered building it as a twin but the proportions were huge and awkward when considering head space and such. His room isn’t terribly big so it would have just dominated the room. I know bunk beds are going to be big too but I feel they take up less visual space because there’s a space between the two beds whereas the tent bed is just a solid object. This is only making sense in my head isn’t it lol.
LikeLike
Sarah, this is amazing! We would love to talk with you about being featured on Remodelaholic with this BEAUTIFUL piece of work! Will you drop me a line at hello@remodelaholic.com?
LikeLike
Hi, I absolutely love this bed, it’s just amazing! I’d like very much the same for my little boy please. Would you be ever so kind to share your plans, or let me know where I can find them, just to have at least an idea of the dimensions. Many thanks in advance, Celine
LikeLike
I’m am in the process of making this bed myself and curious why it says in the dig instructions that you cut 6 pieces for the stilts. Wouldn’t you only need 4? Or where are the other 2 to go? Thank you for this great idea!!! Beautiful work.
LikeLike
Diy instructions***
LikeLike
I spaced 2 stilts along the back of the bed to better support the weight of the bed and minimize eventual sagging!
LikeLike
I love this!! Wow my poor dad and husband have their work cut out for them 😂
LikeLike
Where did you find the sheet with the tree?
LikeLike
Hello ! I love love love following your blog ! Is there any way possible you could get me a material list for this bed in a Twin size? I am dying to have the tpee bed inner home !
LikeLike
wow..I love it!! its soo cool..just for my 20 months old boy.. I loved the color in the wall, bed and litlle owl 🙂 I am wondered how it looks the whole room. Do you have inside any closet? We will do it the same bed 🙂 I am thinking what kind of closet can I buy? Can you send any picture of the whole room..thank you 🙂
LikeLike
You can see a little bit more of the nursery here: https://hellobowsers.com/2015/08/01/his-crib/
Unfortunately we don’t have any pictures of the closet, we haven’t really had time to come up with a nice organization solution for it yet!
LikeLike