
This little project was the result of a problem I was having: You see, I believe that stockings are for little things (barrettes, trinket toys, pineapple corers [true story] etc), needed things (dry shampoo, deodorant, toiletries) and treats! 😉 All small things in their own right but can add up in weight pretty quickly. Because of this, our stockings get pretty heavy, exceed our little stocking holders’ usefulness and come Christmas morning, everyone’s stockings are slouched over on a couch or a chair instead. It doesn’t have the desired effect I’m looking for.

I had seen, on Pinterest, various takes on the stocking post and decided I needed to do a variation on this concept that would match our style. I stumbled across the DIY of a gas lamp style post that Remodelando la Casa had made and fell in love! Within minutes, I had my husband on board and the shopping list made.

Here’s what our shopping list looked like:
For construction
- A newel post for the body
- An outdoor post lantern
- A round flat post cap to mount your light fixture and newel post together
- A length of 1″ dowel to make your hangers
- 4 drawer pulls to cap your dowel
- A length of 2×12 pine to make the base, skirt and a plug
- 4 utility dowels to fasten your drawer pulls to your dowel
- A length of decorative moulding to finish the base edges
- Wood glue
- 2 cans of Rustoleum hammered spray paint
For decoration
- A 3.5×3.5 thin piece of wood or plastic
- A 3.5×3.5 winter scene decoration for display
- White acrylic paint to disguise the decoration base
- A bag of faux snow
- A selection of faux greenery
- Some thin wire to bundle your greenery
- Red ribbon to fasten your greenery to the post
I wasn’t very diligent with the process photos because quite frankly, this whole thing (besides painting) took us an afternoon to make. So I made an exploded diagram of sorts to show you how it came together.
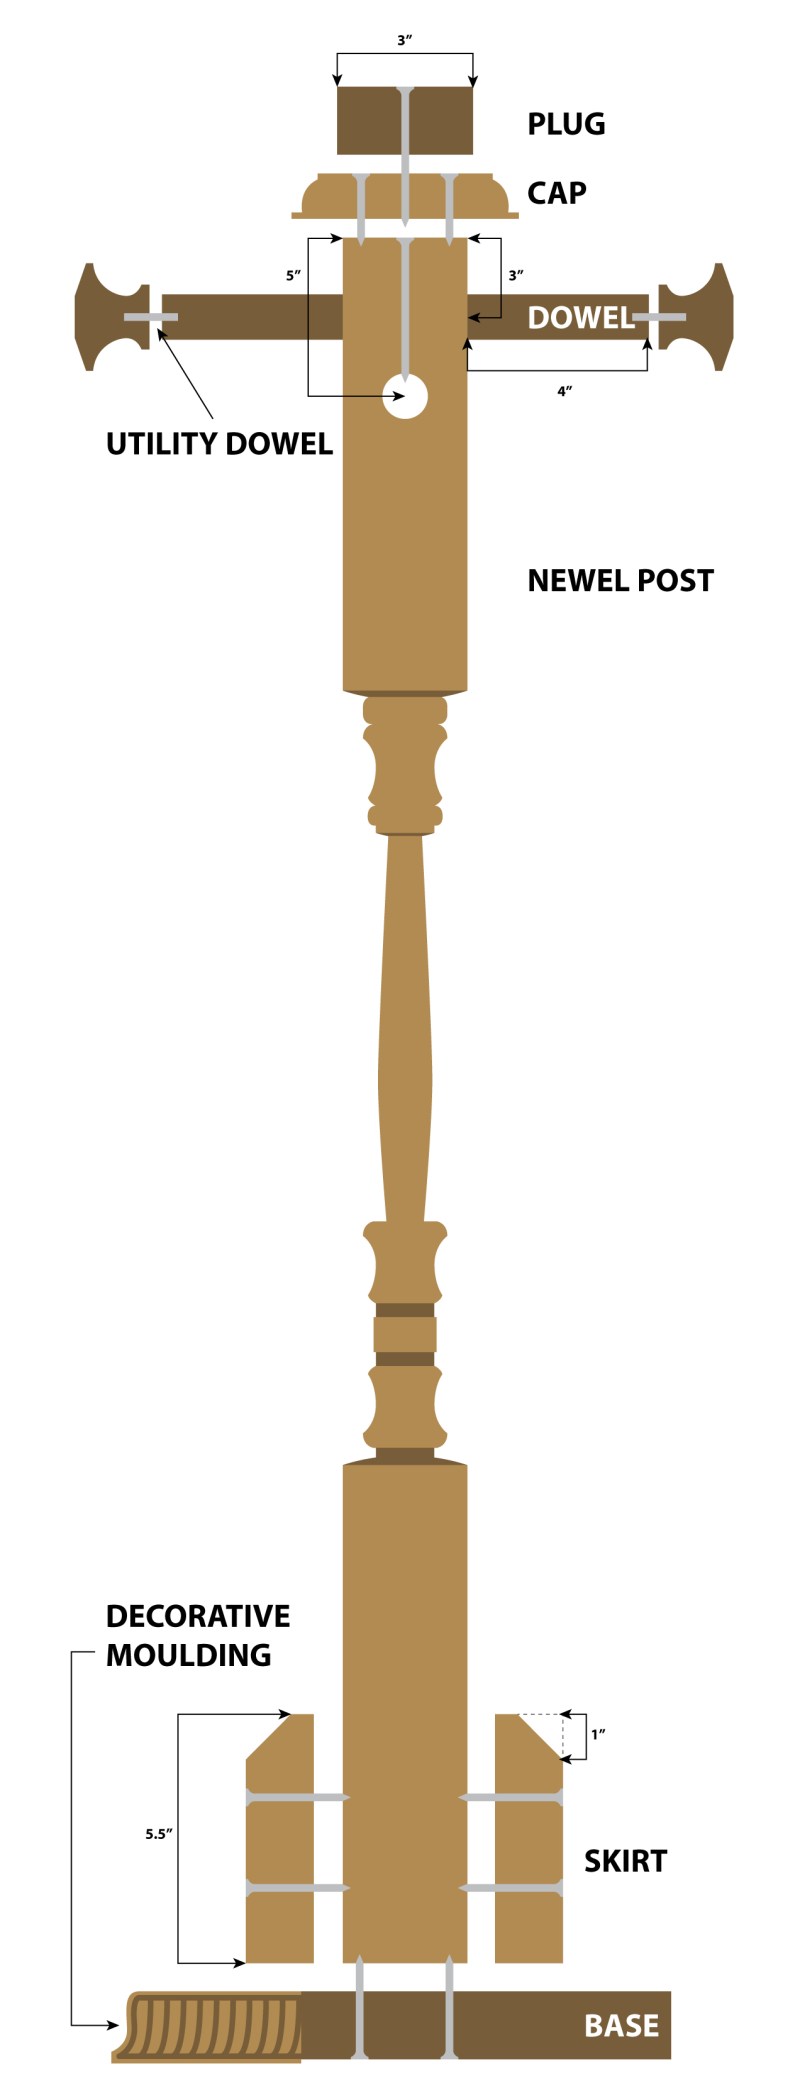
The first step was to cut off the decorative top to our newel post. To ensure the cut was level, perfect and clean, we used our mitre saw. Once that was done, we moved our post over to our drill press. Using a 1″ drill bit, we drilled a hole 3″ on centre down from the top, rotated our post a quarter turn and passed the drill through again 5″ on centre from the top. These holes were for our hanging dowels.
Next, we wanted to make our lives easier by building the base so our pole could be upright and free standing for the following steps. To do that, we took our 2×12 piece of lumber, measured the width (because it’s not actually 12″ wide once it’s dried) and transferred that number to a length measurement so our base was a perfect square.
NOTE: The 2×12 pieces (base / skirt / plug) strategically added much-needed weight to this post. We didn’t want this thing to be easily knocked over by kiddos or tippy with even slightly unbalanced stockings. So if your building one for yourself, don’t skimp on the weight; add it wherever you can.
Next, we prepped our hangers. We cut 2x 10.75″ lengths (our newel post is 2.75″ wide and we wanted the hangers to be 4″ long) of our 1″ dowel. Once cut, we drilled about a half inch into the ends and glued a utility dowel into the holes. We then fed our hangers through the holes we drilled in the post. Once they were centred, one person hung onto them for dear life while the other screwed dead centre through the top of our post and into both dowels at once. This kept the dowels from eventually becoming unglued or knocked out of place with repeated use. Next, we glued a knob onto each end of our hangers by feeding the other end of the utility dowels into the pre-drilled screw holes in our dresser knobs.


Next, we centred our cap on the top of the post and screwed through the top of the cap and into the top of our post. We were mindful that we were going to be screwing our plug into the cap so we staggered our screws accordingly.
Next, we cut a 3″ circle (plug) out of our 2×12 using a 3″ circle cutter on our drill press. The purpose of this plug was to replace the post that the lamp was initially meant for; the lamp has 3 screws around its perimeter to secure it to a post. In our case, these screws screwed into the plug instead. We then centred and screwed our plug through the top and into our cap and post.
Next, we gutted our lamp. I took out the electrical pieces and put them aside if we ever needed an emergency outdoor lamp. 😊 I left the little column that the bulb screws into for 2 reasons:
- I couldn’t get it to come out
- It actually made a nice pedestal for my figurine thingy to sit on.
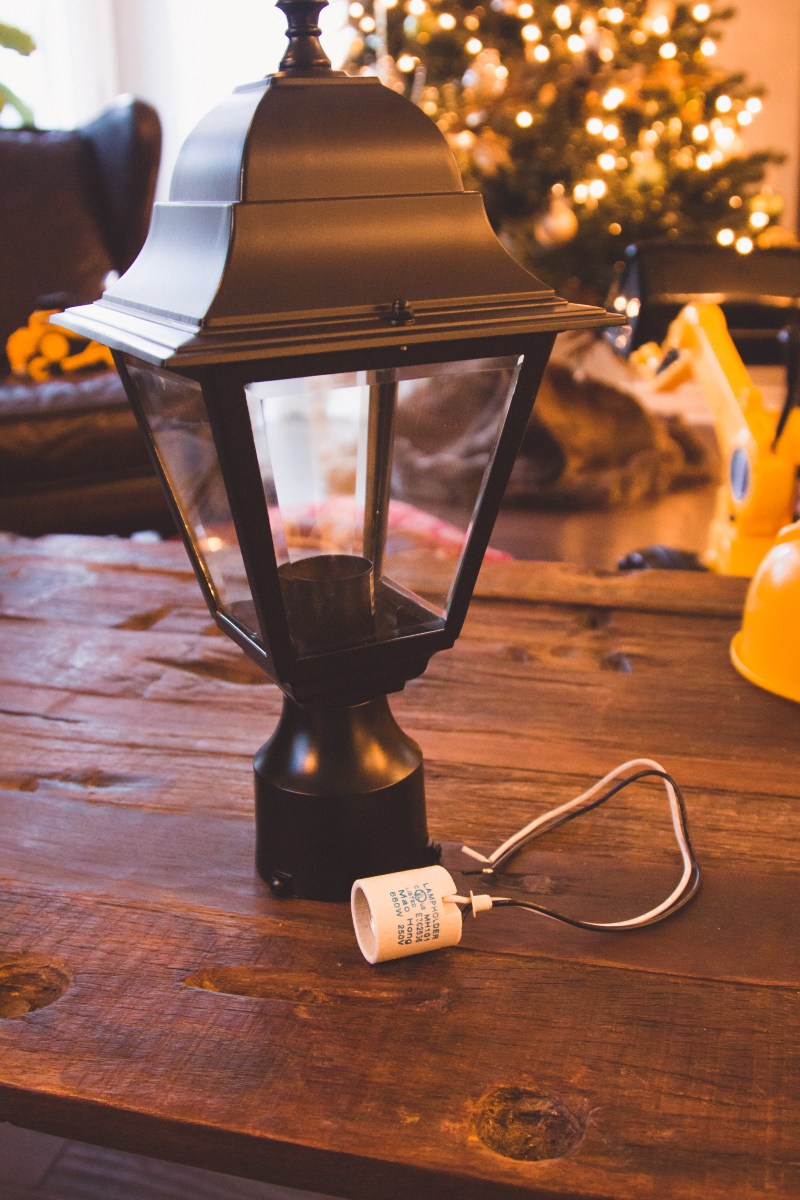
Then we slipped our lamp over the plug until it rested squarely on the cap and tightened the screws around the base of the light until we could feel them catching the sides of the plug. We patted each other on the back as we stood back and admired our project so far. The plug was perfect because it held the lamp pretty darn snug and sturdy, plus since the lamp can be removed, it allows us to hide a future battery pack or whatnot later on if we decide to upgrade it with twinkle lights of some sort.
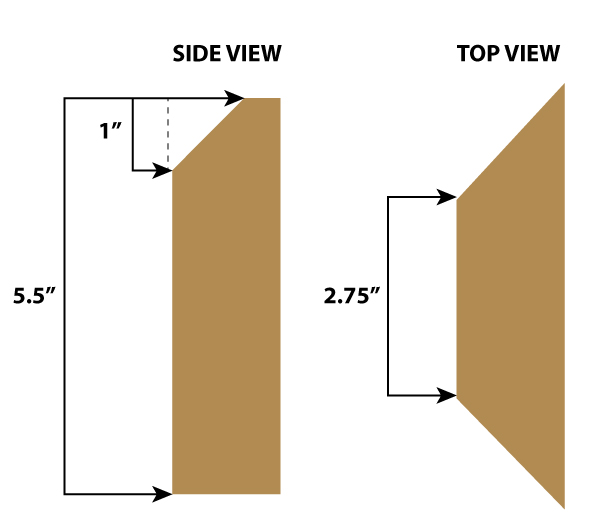
The final step was decorative but as I mentioned above, it was a way to add some much-needed weight to the base of our project. We made the skirt by cutting 4 blocks from our 2×12 with our mitre saw. The blocks were 5.5″ tall and the edges were cut at a 45° with the smallest side being 2.75″ to match our post width. Next, I flipped the blocks on their side, made a mark an inch down from the top of the block and cut it at another 45° angle this time, aimed towards the back so the skirt sloped away from the post.
The final building step was applying our decorative trim to the sides of the base using glue and finishing nails. Once everything was secured, glued and dried, we removed the glass panes and spray-painted the entire thing, lamp and all, with several thin coats of our textured spray paint. I don’t normally gravitate to glossy paint but I wanted this to look as authentic as possible so we used a hammered metal textured paint. She’s pretty shiny!
Now the fun part! To personalize it, I cut a very thin piece of wood to sit inside my lamp and on top of the column that the lightbulb would have screwed into. Once I had the proper size, I shaved about an eighth of an inch off the wood so that snow could fit between the platform and the glass and effectively hide it. I painted it white and then arranged my little display until I was happy with how it was looking. I tacked down my figurines and trees with a small dot of glue to keep them in place and then spread glue around the platform and pressed some fake snow into the glue. Then I spread some glue around the sides of my wood and applied snow to the edges as well, again, to hide the platform. The final step was filling my lamp with fake snow to cover the column and set my display on top!
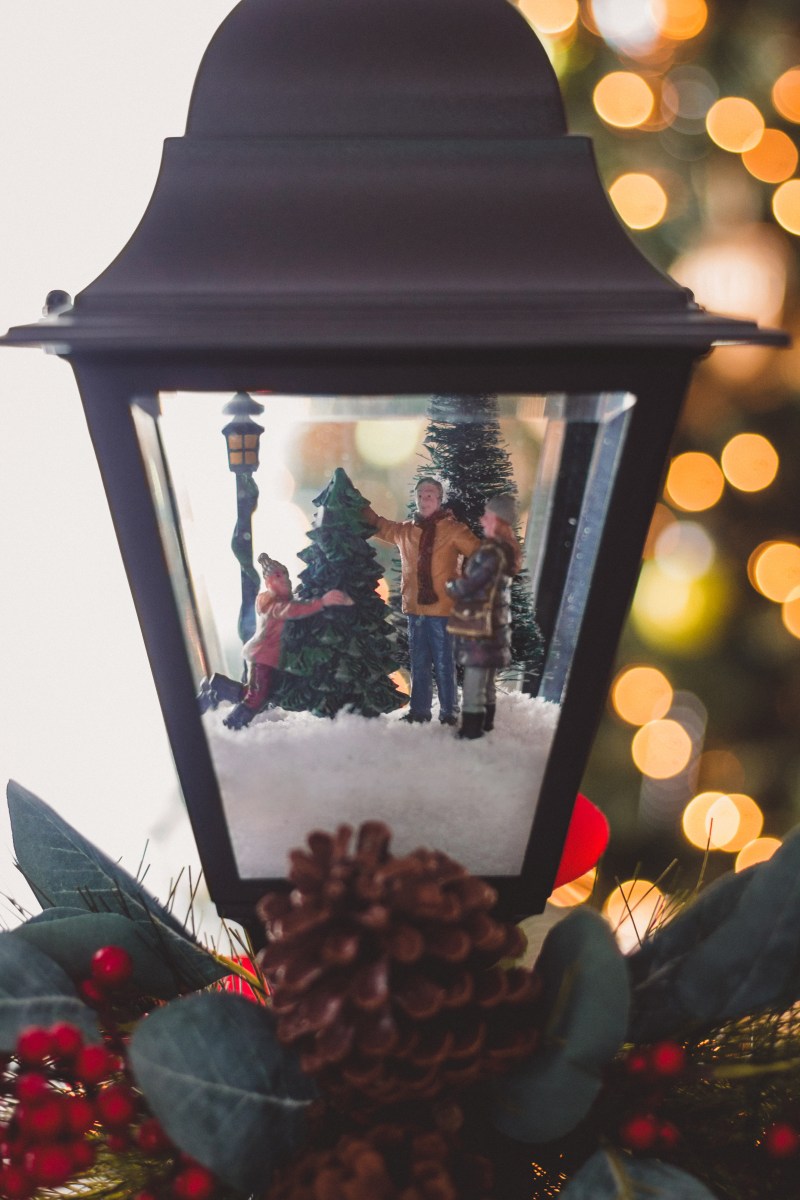
The greenery was the easiest part. I just picked up some various sprigs from my local craft store. I chose different textures and colours that I thought looked good together and layered and bound them together with wire until I was happy with how it looked. then I cut a length of red ribbon and fed it through the back of my sprigs and tied it around the base of my lamp! Done!


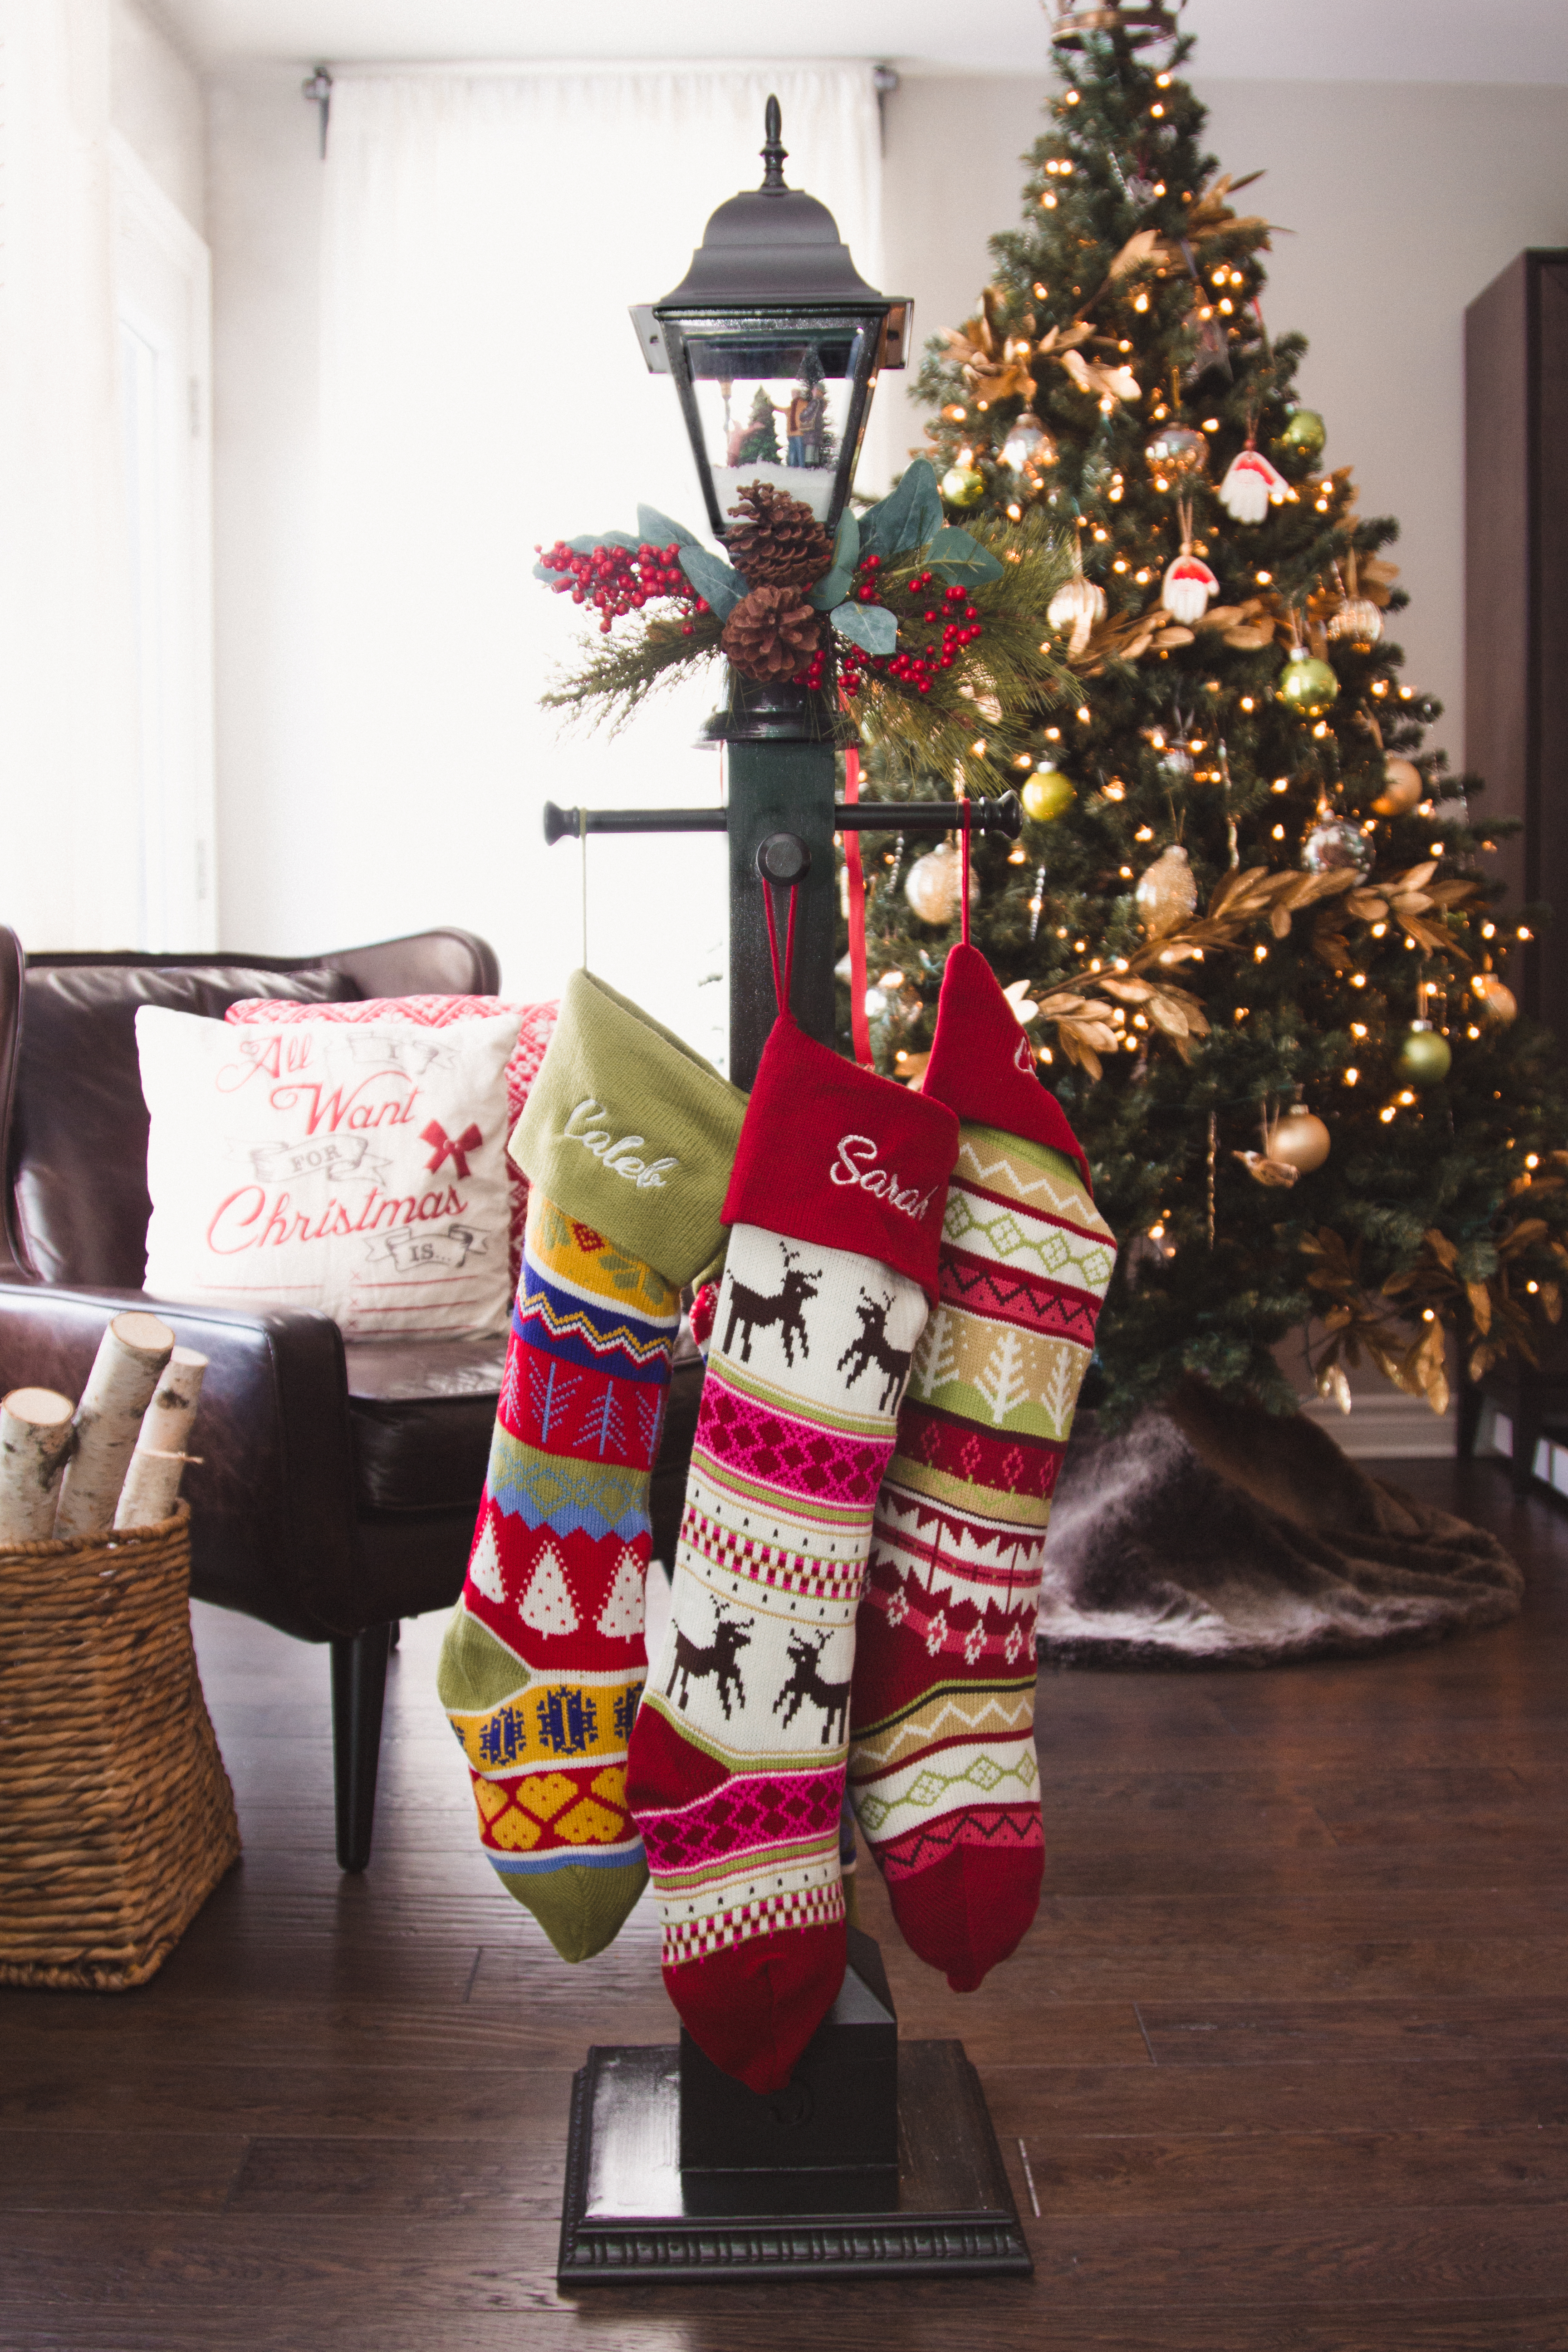
The bonus that came to mind when we had finished the post and placed it in our space was that it allowed me to spread the holiday decor out a bit by removing the stockings from the already ladened mantel and creating their own spot. It’s been bugging me that all of our decorations seem to be in concentrated areas of our home, like the fireplace and dining area and the tree, but this became a piece of furniture that made our main floor look far more festive.
My next step is to figure out a decent way to get a light in there. There’s more than enough space to install something in the roof of the lamp but I would prefer something that was on a timer or remote so I won’t have to keep opening it to turn the light on. Flameless tea lights are too dim, I tried it. I welcome ideas!


That is beautiful and would work for any stockings!!
LikeLike