
We are a household of photographers. Not professional ones…more like we-had-our-first-child-and-have-to-document-every-second-so-we-kinda-became-good-at-it-along-the-way sort of photographers.

It started with purchasing the monthly age stickers you stick on your baby’s chests. The point of these is to take a photo every month in the same place so that you can someday look back at how he’s grown compared to this chair or that pillow and bawl your eyes out at how big he’s gotten. Wait, is that normal? Oh god! Exhibit A:

Anyway, I painted myself into a corner with this parent milestone because I failed to see into the future through the haze of labour recovery and sleep deprivation. You see, my son has a floor to ceiling chalkboard wall in his room that his crib is centered in front of. I wanted him in his nursery chair with said chalk wall as the backdrop of his photos. I failed to see the agony it would be to switch out the crib for the chair every single month but my fiancé diligently and wordlessly obliged to help and keep me happy. But now we have this pain-in-the-ass routine that we do and then a week later we put his room back to normal because we’re too lazy and sweaty to move it back the same day.
Now that we’ve built his toddler bed that is also sitting idly in his room, it’s become a 3D game of Tetris every 4 weeks to shoot 300 pictures to get the $1,000,000 photo of him with his new teeth or his new skill. *Phew See my predicament?
The point is, I needed a better solution. Pair this dilemma with our impending Halloween open house, to which I promised a photo booth, and you’ve got yourself a perfect solution in this simple DIY!
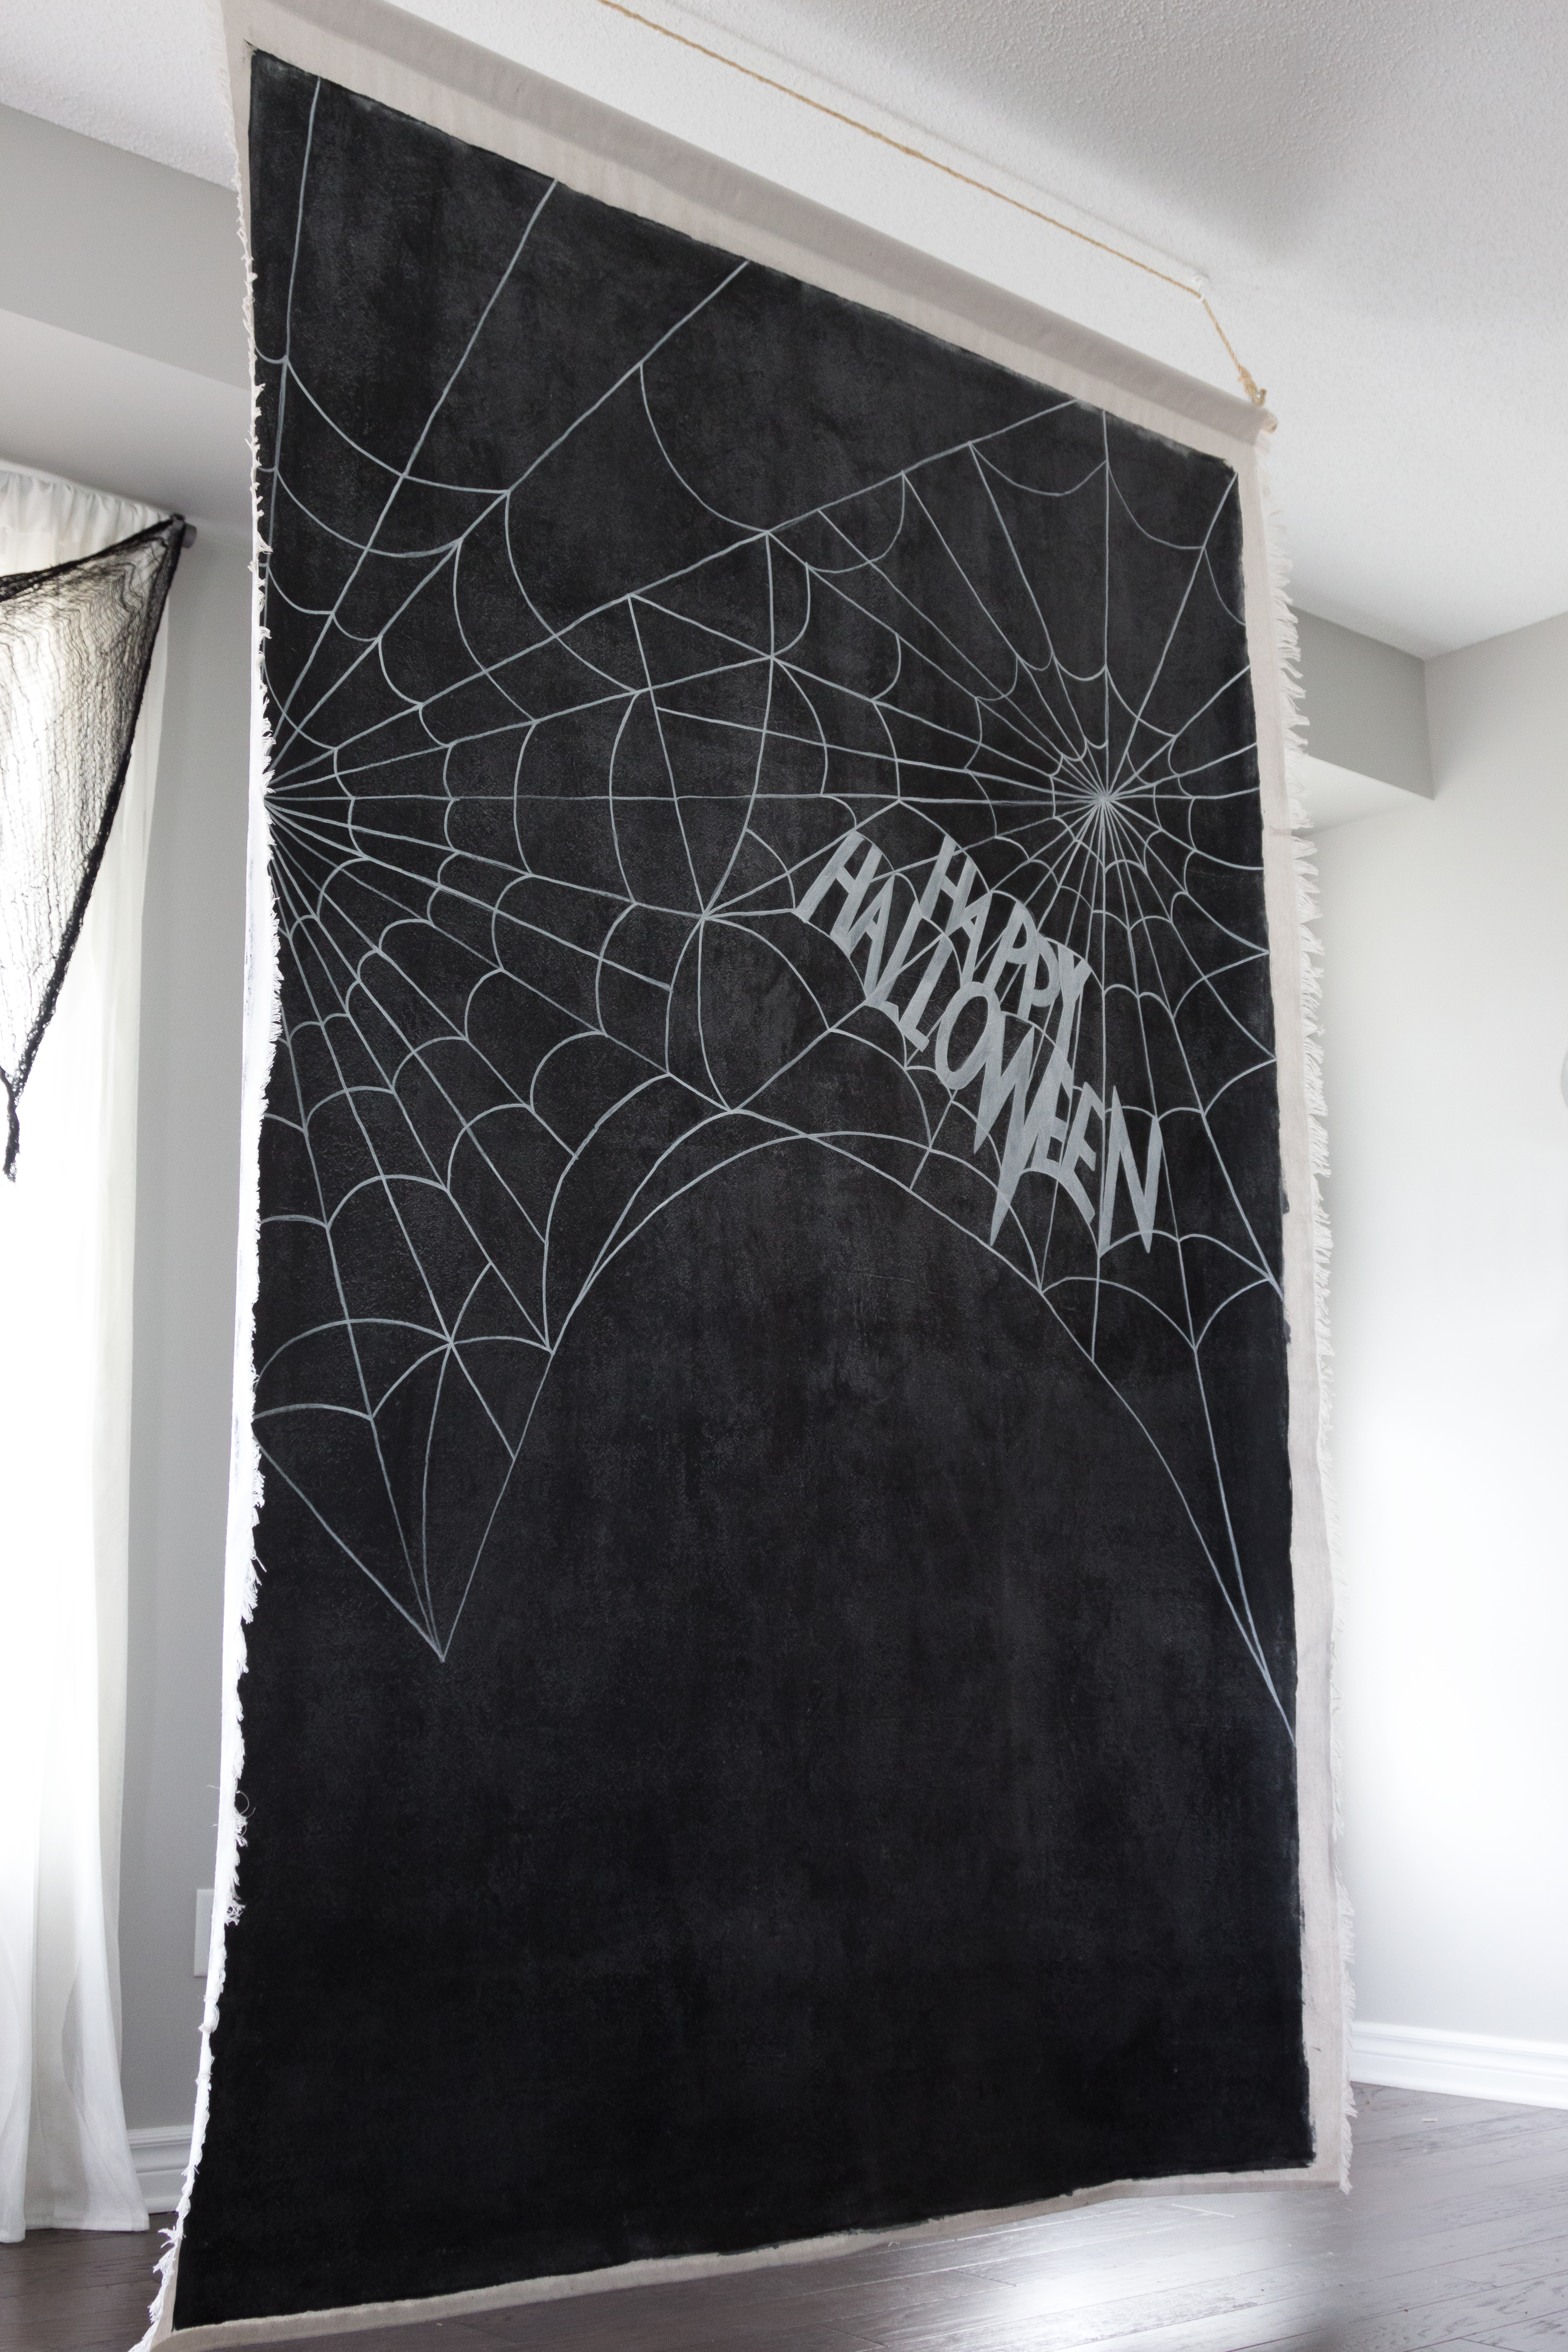
This is a genius idea if I say so myself. A giant 6×9 foot chalkboard canvas that can be written on, rewritten on, rolled up, stored, toted around, shared, relocated, repurposed…..you get the idea. It’s amazing! Let’s get started!
Your shopping list looks like this:
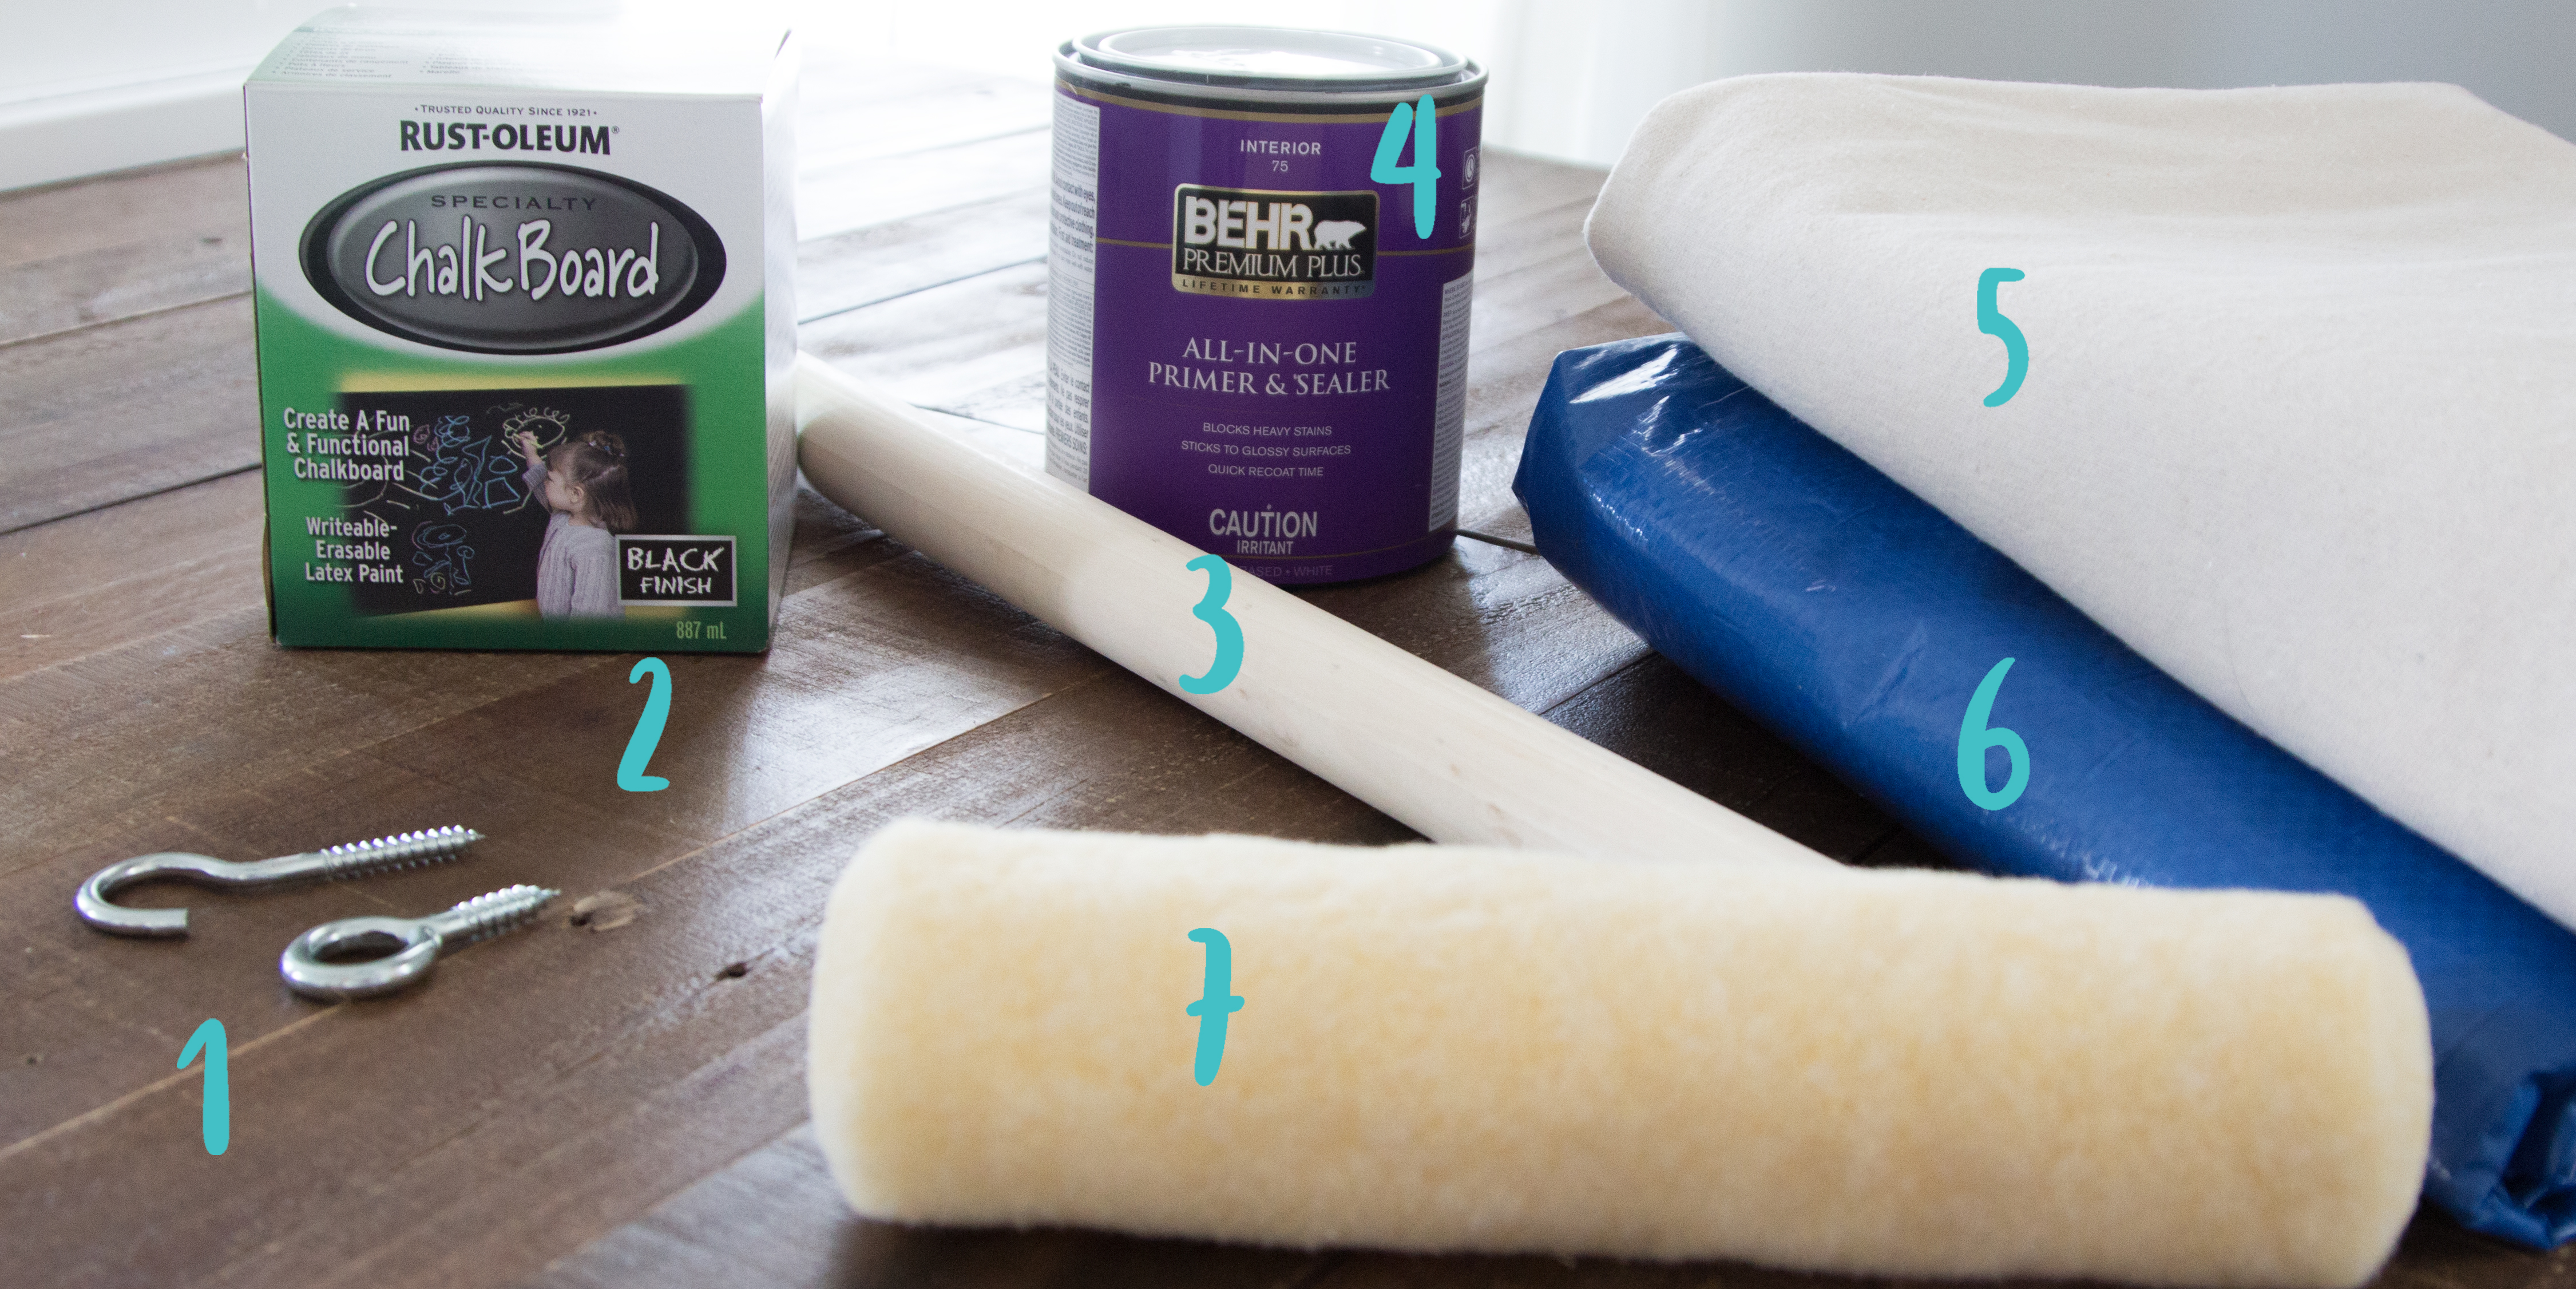
- Mounting screws. We are hanging ours from the ceiling
- Chalkboard paint
- A dowel. Our’s is 1-1/4″ thick.
- Paint primer. Get them to tint it as dark as they can.
- A painters drop cloth. Our’s is 9×12′ which we will cut in half.
- A tarp. *VERY IMPORTANT* Do not attempt this without a large enough tarp underneath. The paint will bleed!
- Chalk (not pictured). Go to Toys R Us and get the big sidewalk chalk so you’re not priming this all day.
First off, this bad boy is made on a painter’s dropcloth that can be bought at the hardware store! I bought a 9×12′ and cut it down to size. Now I have left over canvas to do Santa bags!
So I didn’t photo document the prep work but first you’re going to want to cut down your dropcloth until it’s the size you want. Keep in mind that you’re going to lose a few inches in height to the loop you will sew for the dowel.
Second, wash your dropcloth. I used regular detergent, set it to hot rinse and heavy soil and let it wash for an hour in the washing machine, then threw it in the dryer to dry completely.
Third, IRON. Ironing your dropcloth is important because once you paint it, it will retain any wrinkles it had prior. I learned this the hard way.
Next, and this is a personal preference, I frayed my sides (not the bottom or the top). I find that seams make the edges stiff and therefore kink, crimp and bend when I don’t want them to. Dropcloths also fray beautifully. All you have to do is pull at the vertical threads until they are the desired thickness.

Next I sealed the corners with a little drop of fray-check in each corner and sewed about a half-inch in from my fray.

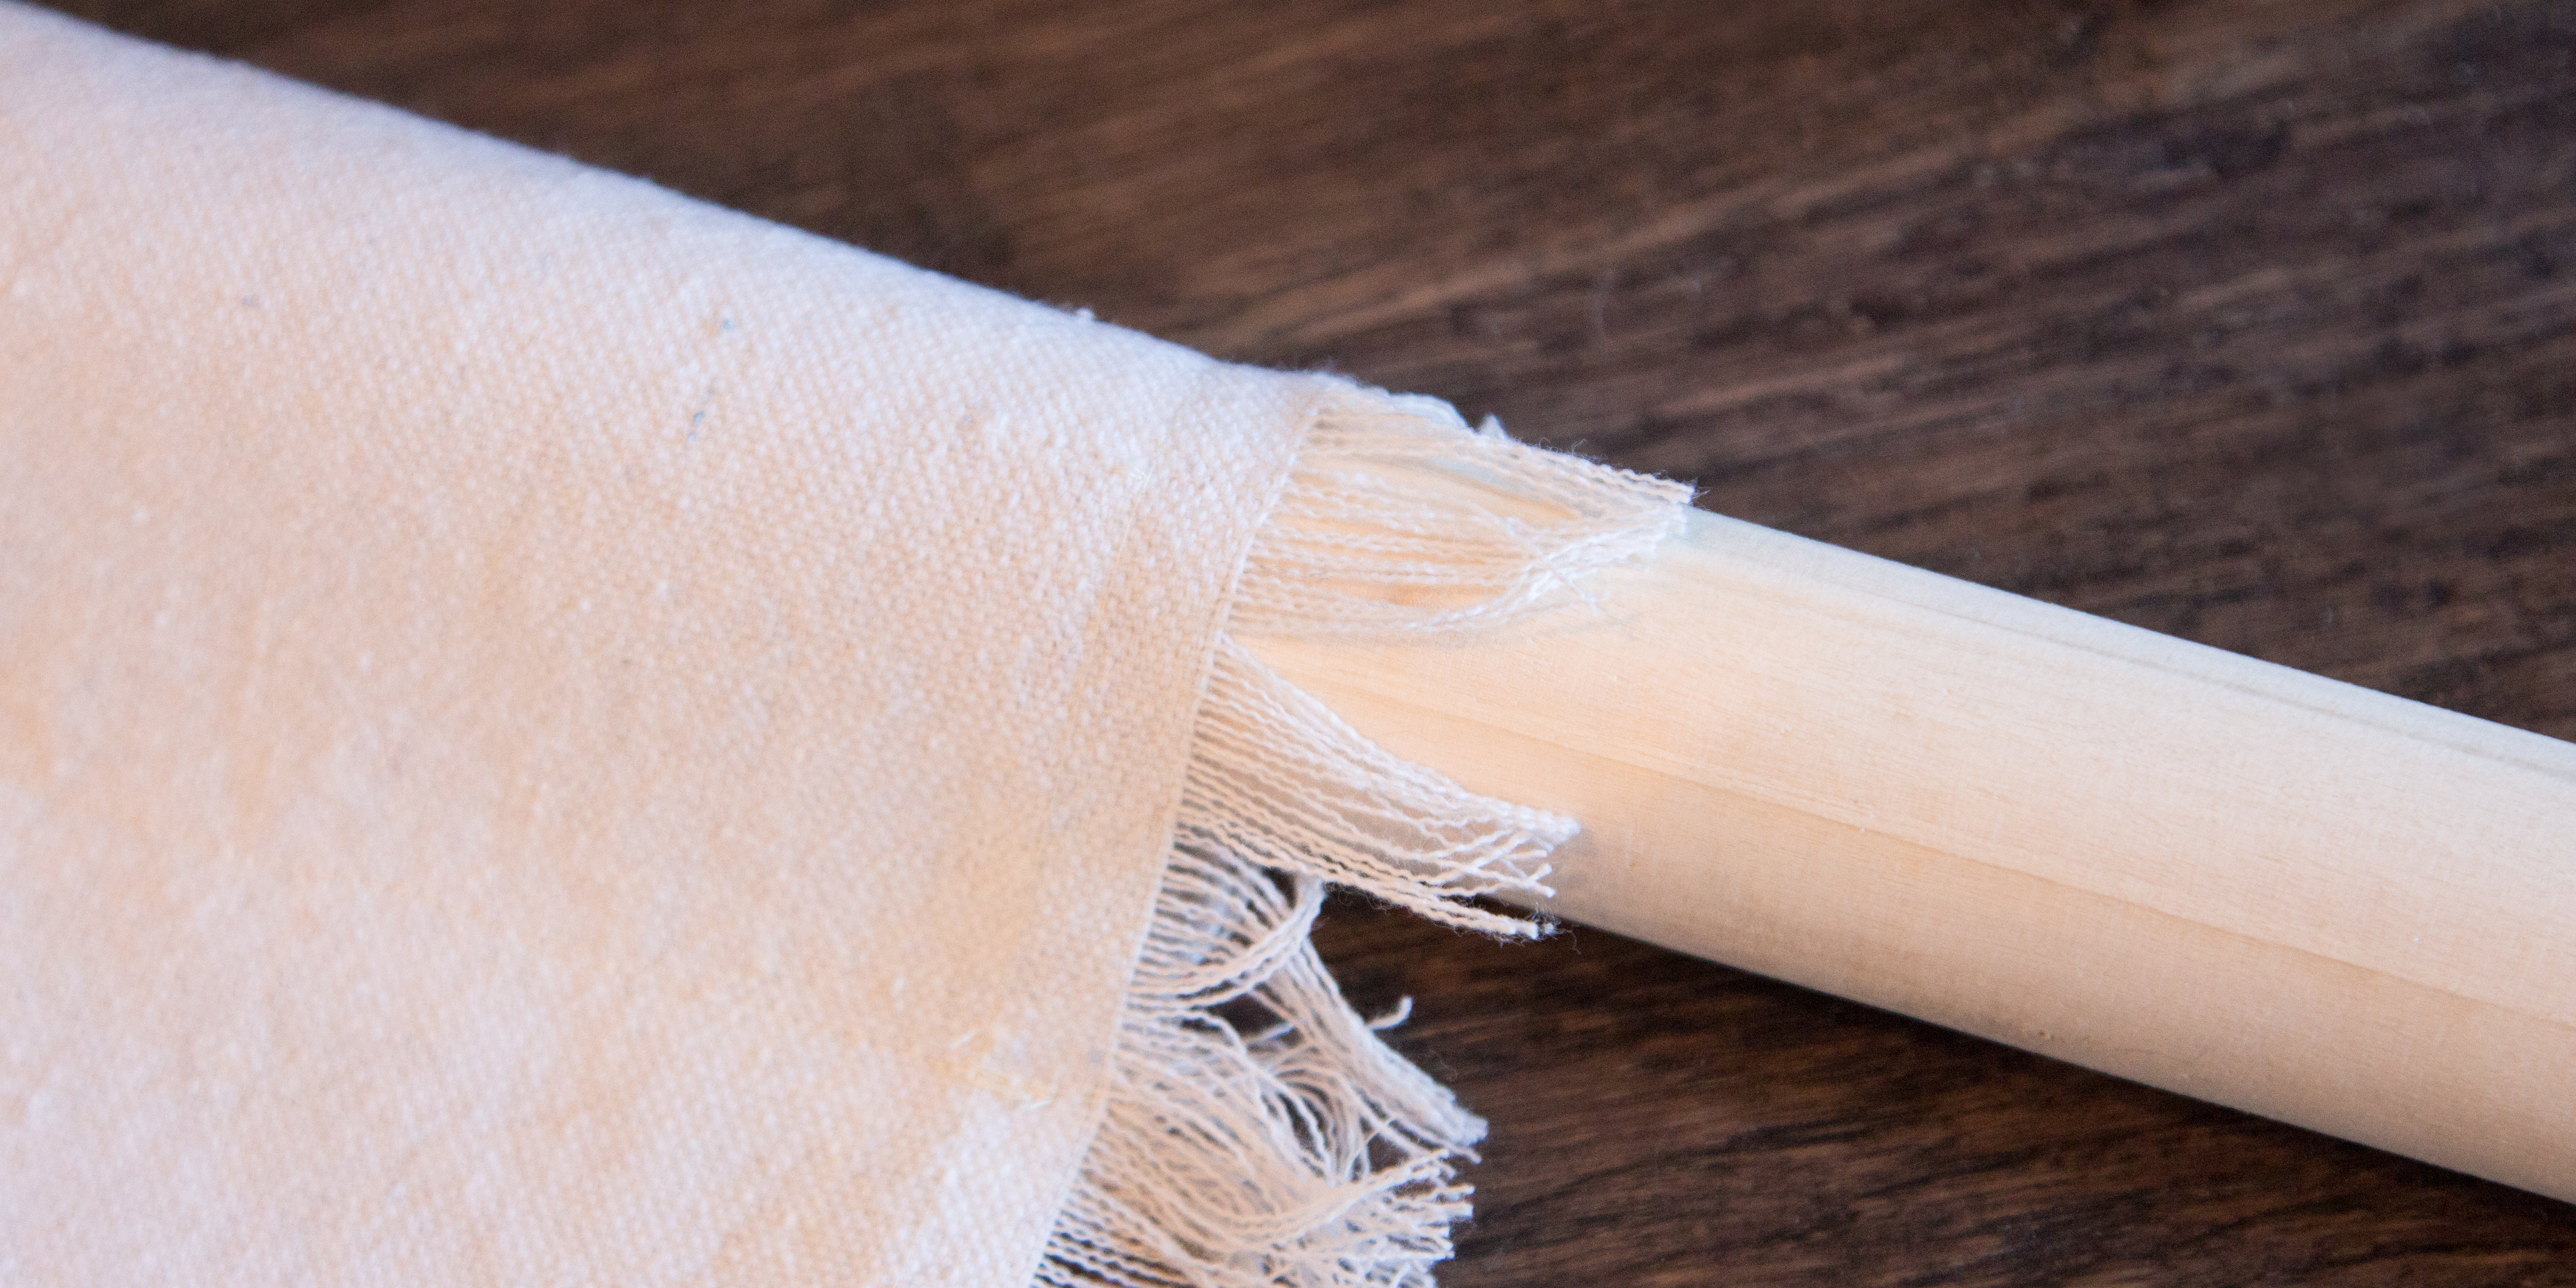
Next sew a loop at the top for your dowel. My dowel was 1-1/4″ in diameter so I sewed it quite a bit bigger than that. One thing you want to keep in mind is that you want to sew the loop big enough to accommodate your eyelet screw that you’ll attach for hanging if you don’t want to unscrew it every time you need to remove the dowel from the canvas. Once it’s sewn, you can insert your dowl and attach your eyelets.
Next, fold your fabric under at the bottom and make a finished seem. The bottom will need to be a bit more durable since it may get stepped on.
Then I doubled up my tarp and laid it out with my canvas on top. Time to paint!

Get the canvas as flat as you can. Any wrinkles will be immortalized in paint once it dries. Now the canvas was pretty thirsty and soaked up more paint than I thought it would. We bought a small can of primer and it only covered 3/4 of the canvas so we had to buy a second. Put it on pretty thick. The more primer you use, the easier and less chalk paint you’ll use (and chalk paint is pretty pricey). We only used 3/4 of a can of chalk paint using a pretty thick coverage with no need for a second coat!
Now can I give you a piece of advice? You’re going to want to try to paint perfect clean edges, I know, I can see it in your eyes. Maybe painter’s tape has flashed across your mind’s eye by now but here’s the thing; You’re going to tape it up and get painting only to find that your paint is bleeding under the tape. It won’t be perfect. You’ll get out a tiny brush to fix the edges but it won’t be crisp and it will make your eye twitch and send your OCD into a downward spiral. Just grab a paper bag and take a few deep breaths into it for a moment and embrace the imperfection. It will look awesome, I promise.

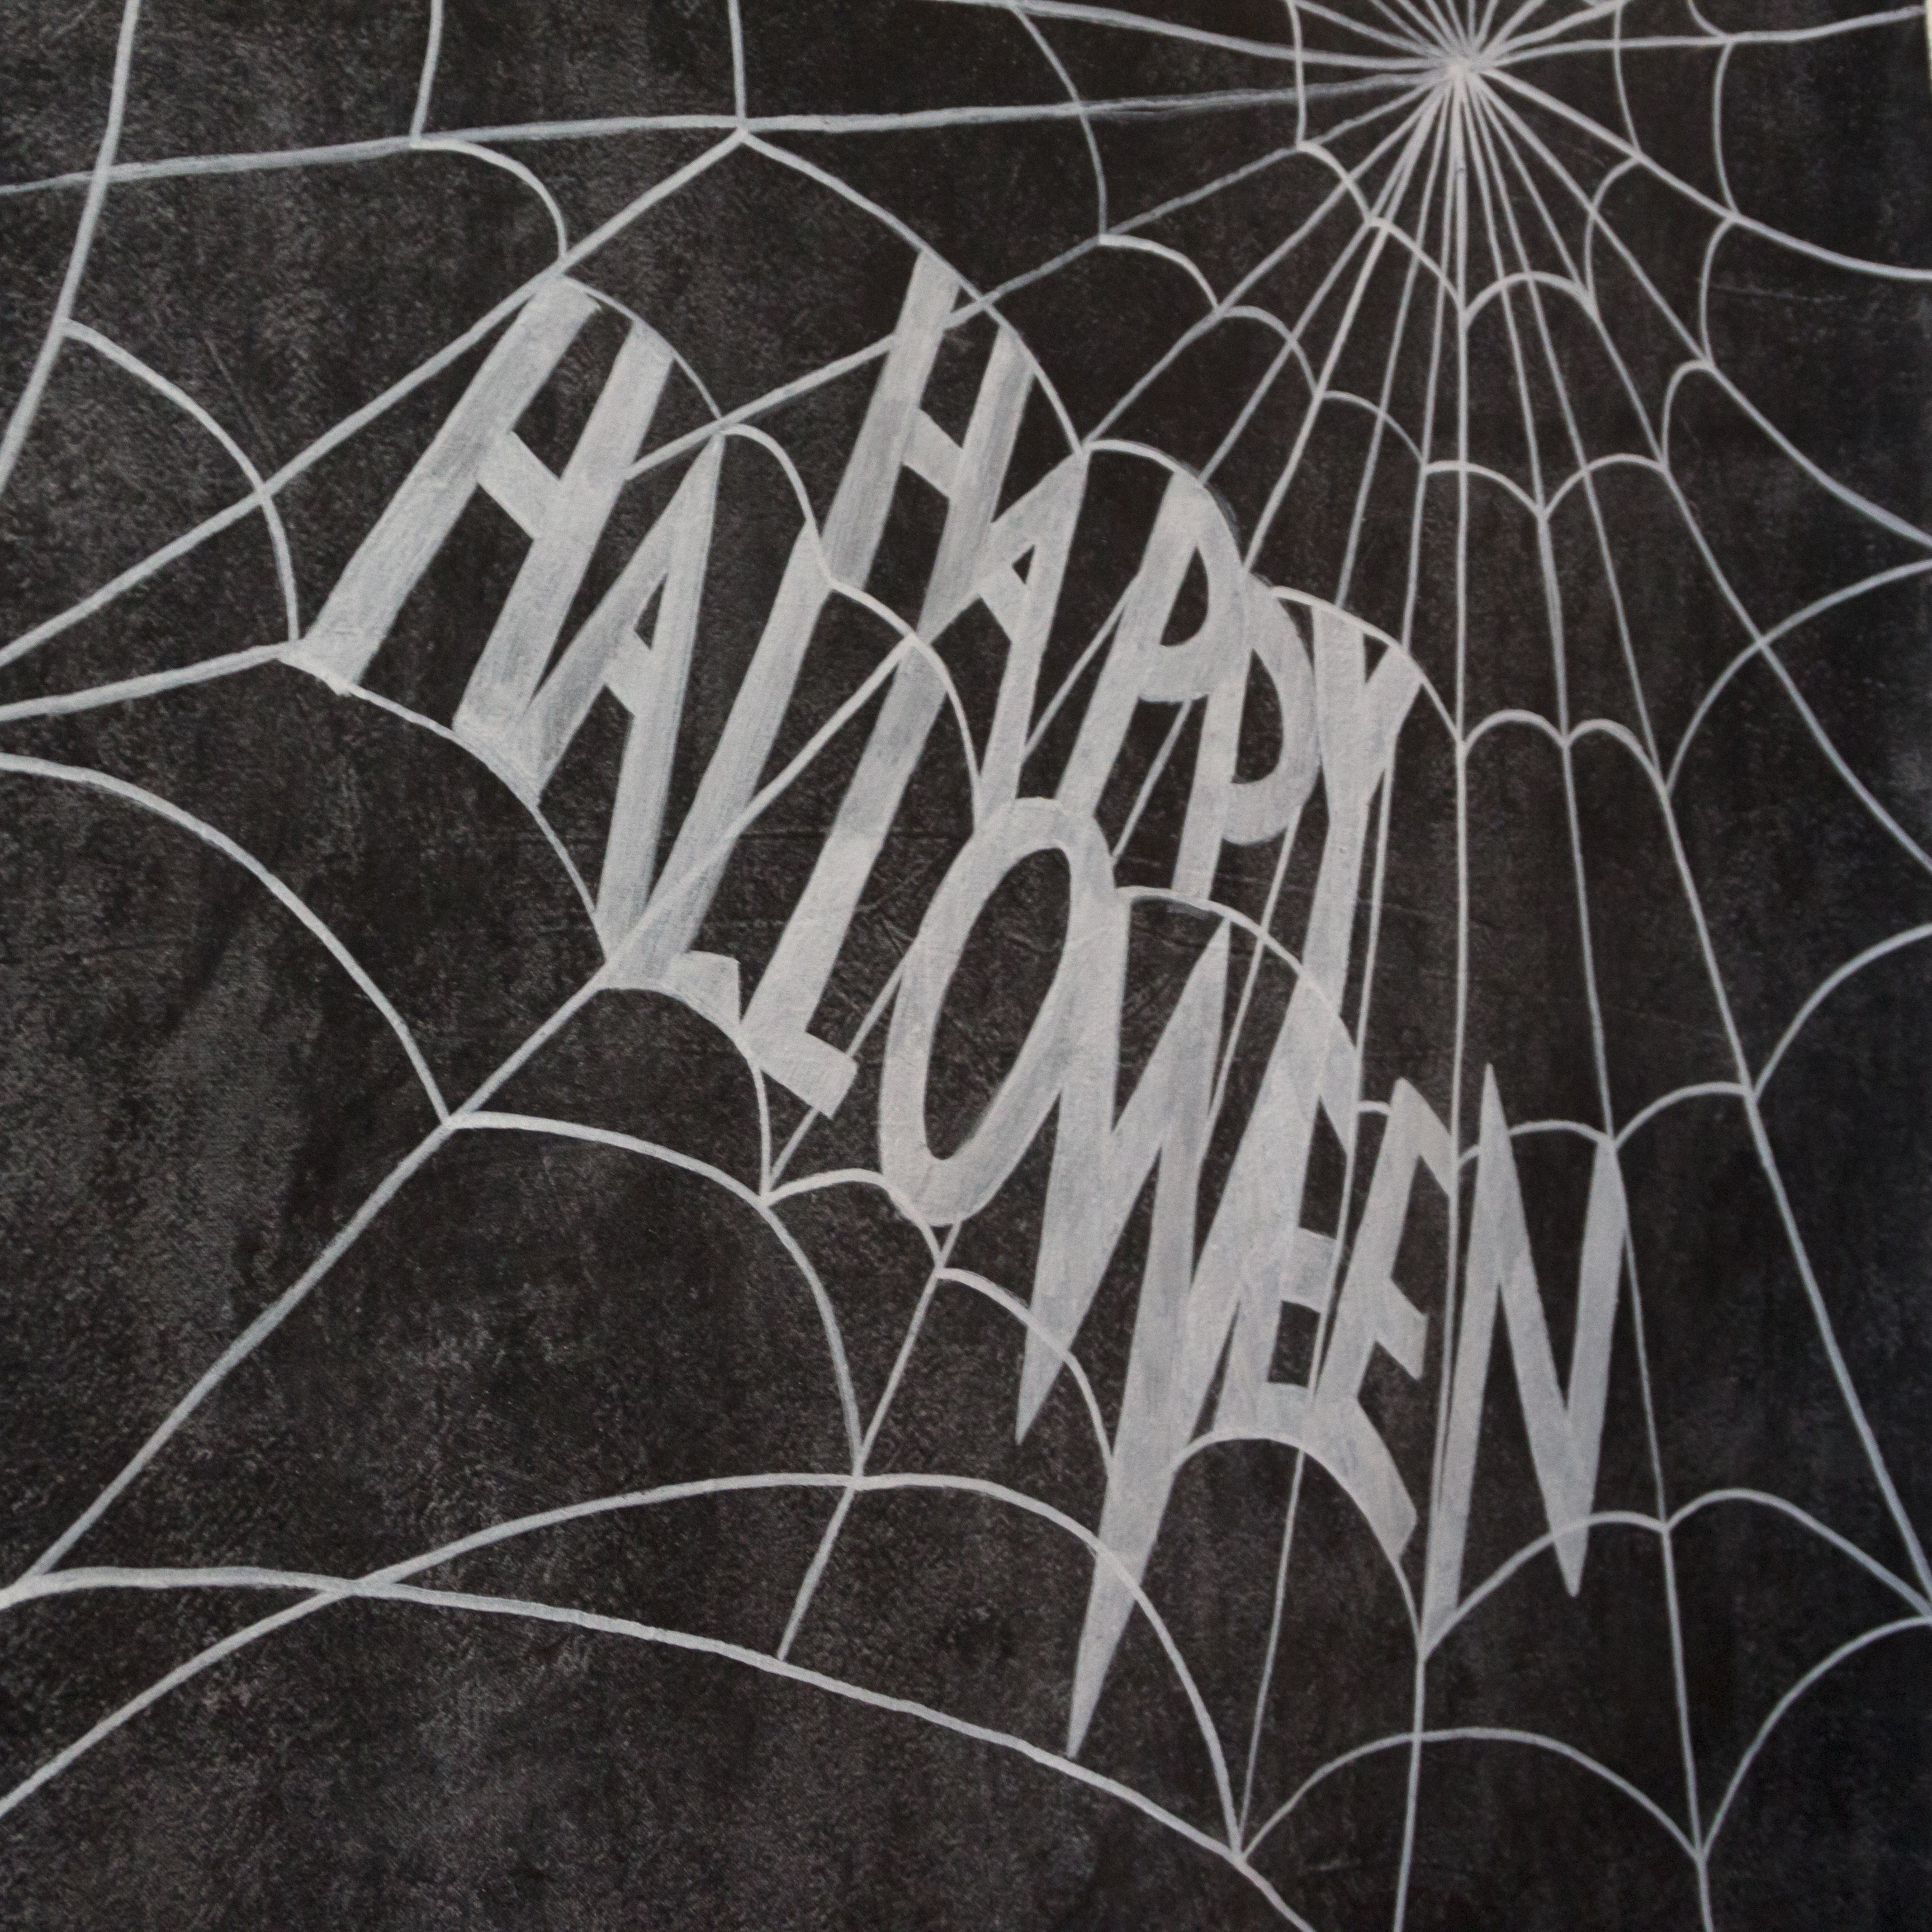
Once it dries, it’ll be a beautiful flat black but we don’t stop here. I personally hate this step because I love how pristine it looks. If you want to write and rewrite your canvas, you’ll have to prime it; Otherwise, you won’t ever be able to clean off what you originally drew. Since I’m using this for Halloween first and foremost, I don’t think my future self would appreciate permanent spider webs in all of my son’s photos…. So, to do this, you want to take the sidewalk chalk, flip it on its side and rub every inch of the canvas with it.

Next, if you can, take a vacuum to it to suck up any loose chalk. Then a wet rag to it will bring it a little closer to black but it won’t be as pristine :(. And there you go! You take it from here and make it anything you like! Here’s what I did for our Halloween photobooth!


You have remarkable talent love dad and Cheryl don’t ever stop dreaming
LikeLike
I love using canvas and drop cloths for large flags.. You can do so much. Love it.
LikeLike
I hope you see this comment. I’m wondering how well the painted canvas has held up? I want to make this for my preschool class and hope that it’ll last a long time.
LikeLike
It has actually held up pretty well! There’s one little spot that didn’t quite erase but I don’t think I cured it well before using it. Everywhere else has erased beautifully! My advice would be to use a primer first, tinted as dark as you can and do at least 3 coats of chalkboard paint. Also I’d maybe chalk the whole thing twice before you use it which is what I should have done. Chalk it and smear it around to get in all the crevices since it won’t be an entirely smooth surface. I also use chalk markers for a more durable and long lasting application. Good luck!
LikeLike
so you think Primer is a key to longevity?
LikeLike
You will use less chalkboard paint if you prime! I just found the canvas to be “thirsty” so I’m glad it soaked up the primer first and not my good paint. Plus you’ll save money that way because primer costs way less than the chalkboard paint in my opinion.
LikeLike
Thanks!
LikeLike
Oh my gosh!! Now I need chalk marker recommendations! It seems very hard to find some that actually erase. What do you use and how do you clean your canvas?
LikeLike
I use this brand: https://hellobowsers.files.wordpress.com/2016/12/10248384.jpg for the most part simply because that’s what’s available at the Michael’s near me. I’ve used all kinds on various projects though and they all work out the same for me! Other brands come with different points which comes in handy every now and then. Basically whatever you can find!
LikeLike
Does the paint get brittle and crack when the canvas is rolled up to be put away?
LikeLike
This is Awesome! I love the way you wrote on your new blackboard, do you have recommendations on the stencil?
LikeLike
Love this idea. So many things you can do with it
LikeLike
How is it holding up?? Thinking about creating this for my public library. Can it be rolled up / transported smoothly?
It’s really lovely thanks for sharing
LikeLike
It’s held up remarkably well! We’ve used it for Halloween, Christmas and a few cocktail parties over the last 2 years as a plain backdrop or with illustrations/words on it. The chalk marker holds its own because it dries almost like paint however it takes a bit of scrubbing to clean it up like new. It’s pretty durable though and I haven’t experienced any cracking or transferring yet from being rolled up! I’m really happy with how it’s held up!
LikeLike
Do you think I could use normal paint for the dark background and white graphic on top if I want to keep a design fix and not be able to erase it?
LikeLike